10-8 Everything Detection Sample Tutorial
After working through the previous chapters, you can now switch between various dedicated AI models with confidence. But what if your customer has a special request: "I want to detect backpacks or cups in the image," and the official package does not provide dedicated models for those objects?
This chapter will help you unlock: GenAI Everything Detection. This is an AI model with "semantic understanding" capability. The biggest difference between it and traditional object detection is: you do not need to retrain the model. You only need to pass a piece of "text" through the API, and the AI will automatically draw boxes around objects in the image that match the text description.
Learning Objectives
Through this chapter, you will learn:
1. How to understand and load a more complex GenAI model file structure.
2. How to directly reuse the 10-3 project structure without changing the UI.
➤ Review the human detection model here: 10-3 Human Detection Function Example Tutorial
3. How to use the new Prompt API: QDEEP_SET_OBJECT_DETECT_CUSTOM_SEARCH_TEXT, giving the software zero-shot learning capability.
Preparation
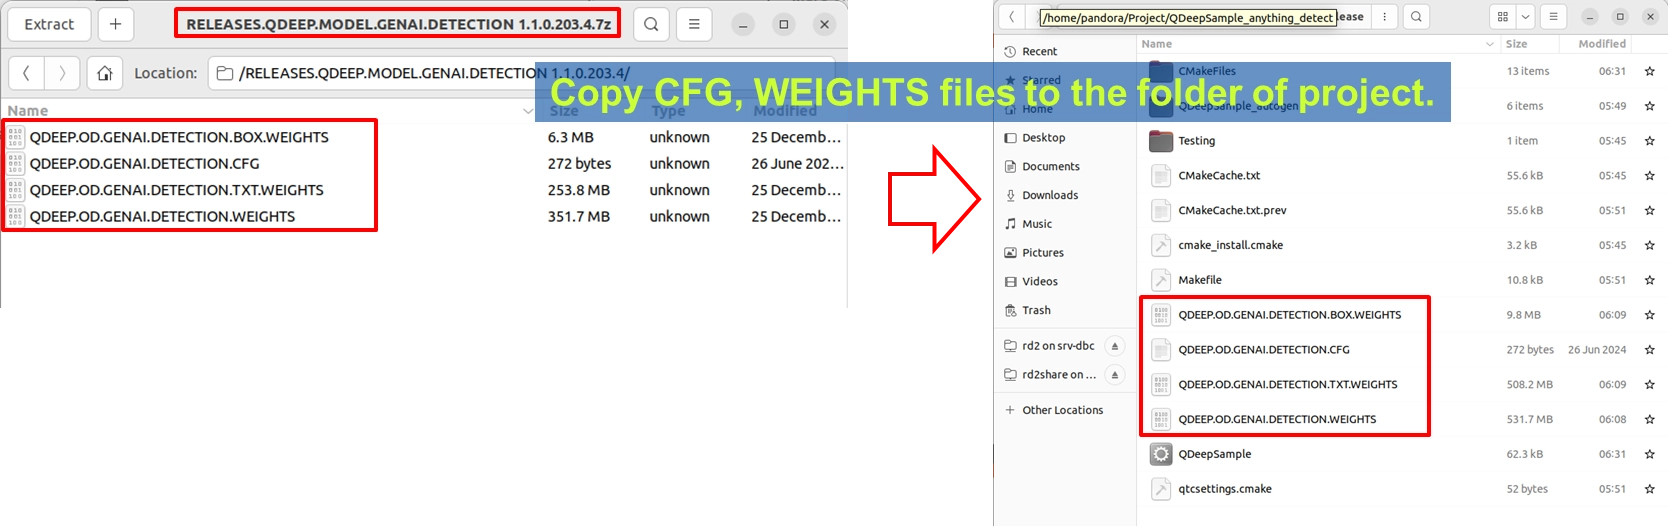
This model package is slightly different from previous ones. Because it combines image recognition and semantic recognition, it contains more files:
1. Take the GENAI.DETECTION model archive provided by YUAN and extract it.
2. You will find 4 key files inside:
-
QDEEP.OD.GENAI.DETECTION.CFG
-
QDEEP.OD.GENAI.DETECTION.WEIGHTS
-
QDEEP.OD.GENAI.DETECTION.TXT.WEIGHTS
-
QDEEP.OD.GENAI.DETECTION.BOX.WEIGHTS
3. Be sure to copy all 4 files and paste them into the build output directory of your Qt project. If any one of them is missing, the AI will not be able to understand human text.
How Should the Core API Be Modified?
This time, the UI does not need to be modified at all. We only need to focus on the "five core APIs" in the code and insert one brand-new API.
-
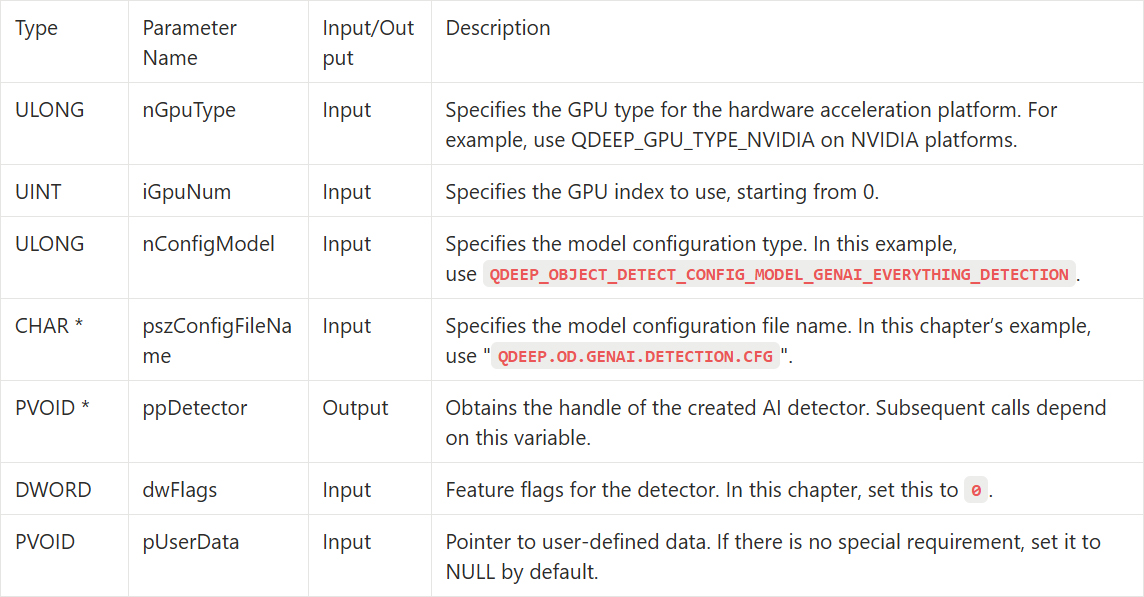
Modify the detector creation settings: In the QDEEP_CREATE_OBJECT_DETECT API, change the model configuration value to the dedicated QDEEP_OBJECT_DETECT_CONFIG_MODEL_GENAI_EVERYTHING_DETECTION.
-
Meet the new API: custom search text. This API is the bridge that lets us communicate with the AI. We must tell it in code "what you want to search for."
‧ API name: QDEEP_SET_OBJECT_DETECT_CUSTOM_SEARCH_TEXT
‧ Key parameter pszSearchText: Specifies the object name you want to detect as an English string. For example: "a glasses", "a cup", etc.
QDEEP_CREATE_OBJECT_DETECT
This is the key API for creating the AI engine and loading the model. Users must initialize the detector through this API.
QDEEP_SET_OBJECT_DETECT_CUSTOM_SEARCH_TEXT

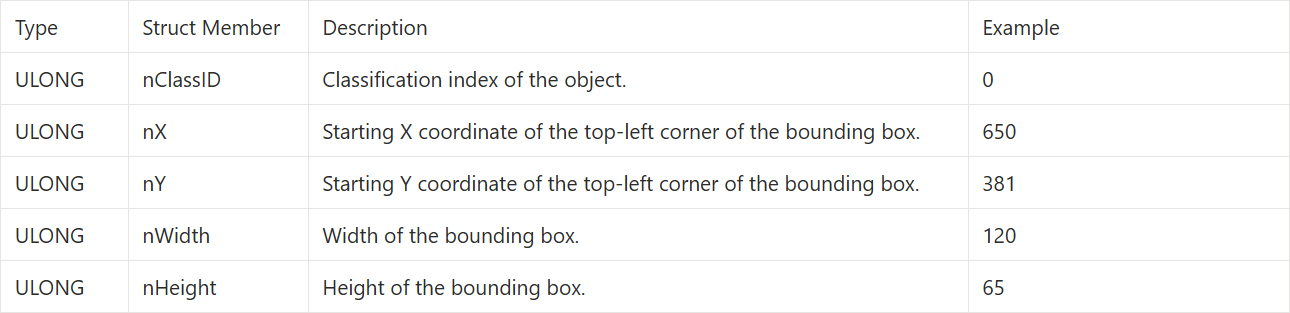
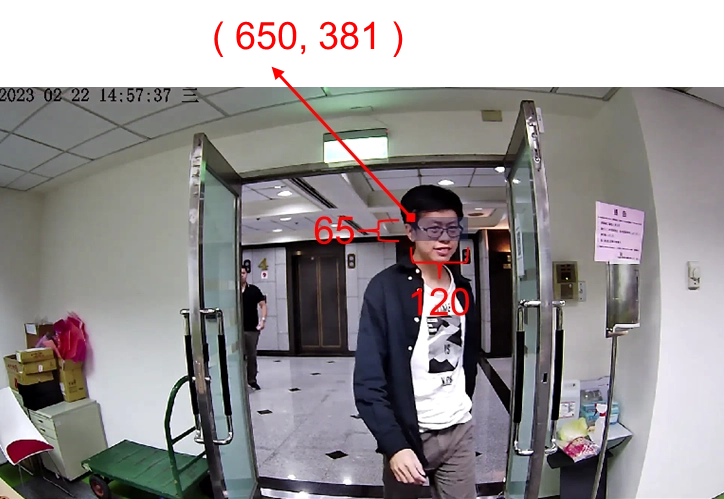
QDEEP_OBJECT_DETECT_BOUNDING_BOX Structure
Because we are entering text and letting the AI search freely, the AI engine does not have a fixed classification dictionary. Therefore, in the returned structure, nClassID will always be 0.
Writing the Core Code
Open your 10-3 project, and make the required code changes:
Modify Model Loading and Add a Text Prompt
In the constructor MainWindow:MainWindow(.) inside mainwindow.cpp, find the code that creates the detector. Replace it with the parameters mentioned above, and immediately call the text search API below it. This time, we will give the AI an interesting challenge: finding "glasses (a glasses)" in the image.
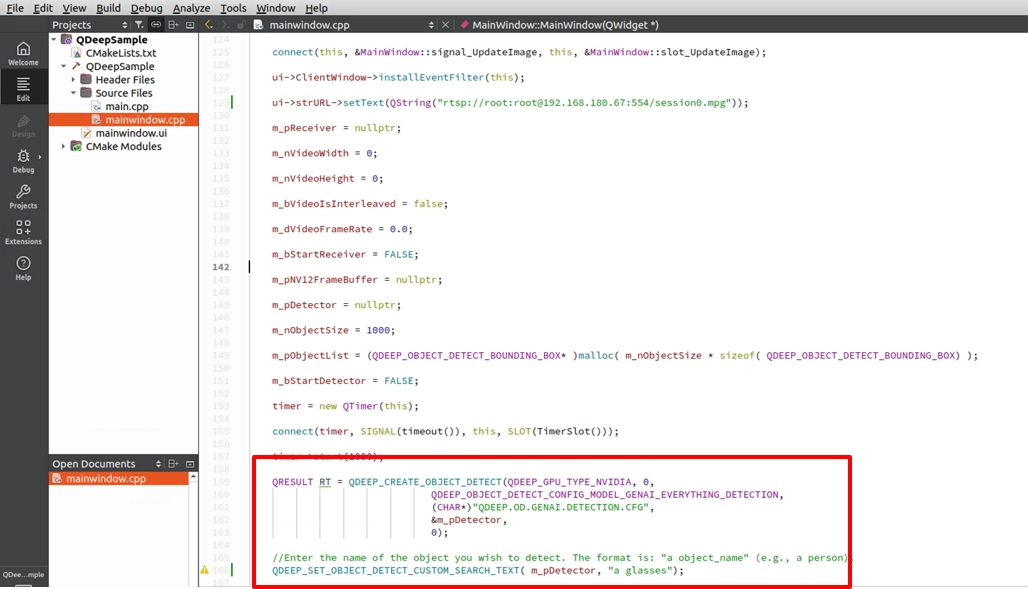
Expand the Class Name
Next, go to the on_video_decoder_broadcast_client_callback callback function. Since nClassID is always 0, we can directly set the array label name to the same string we just wrote in the API.
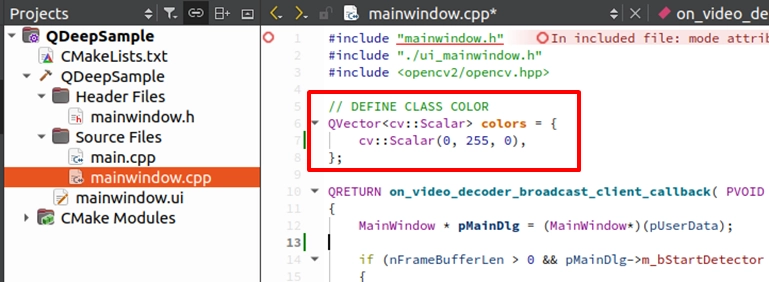
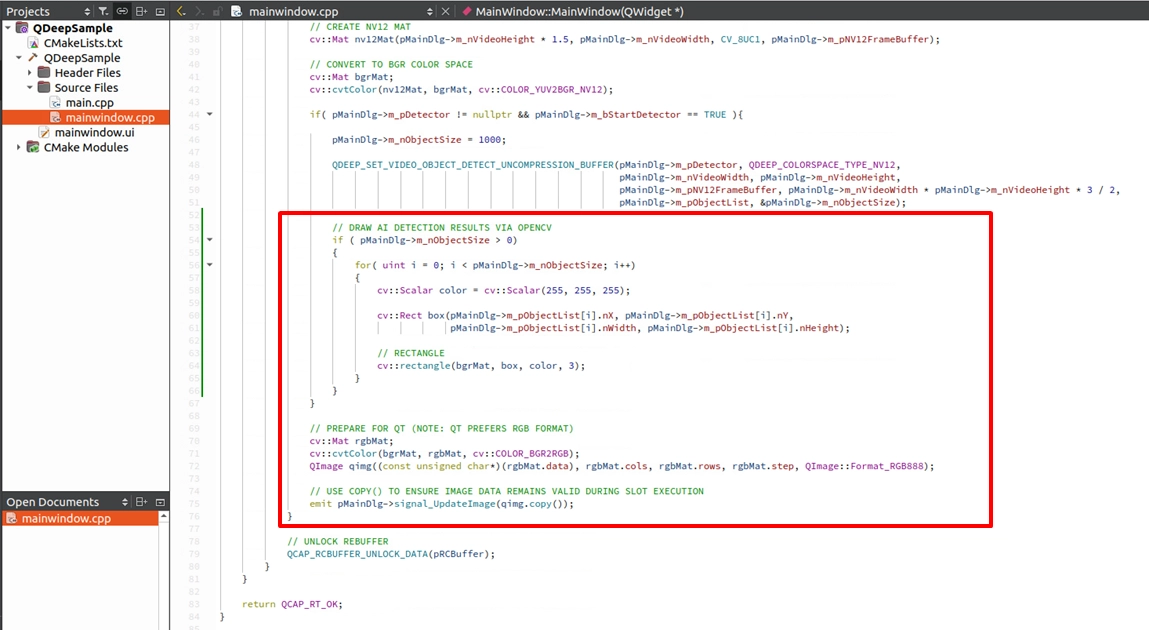
Use OpenCV to Draw the Recognition Result
Final Verification
Click "Build and RUN" in the lower-left corner to run the project:
1. Enter the camera URL and click START RECEIVER to obtain the video.
2. Click START DETECTION. You will see the AI accurately draw a box around the glasses in the image.
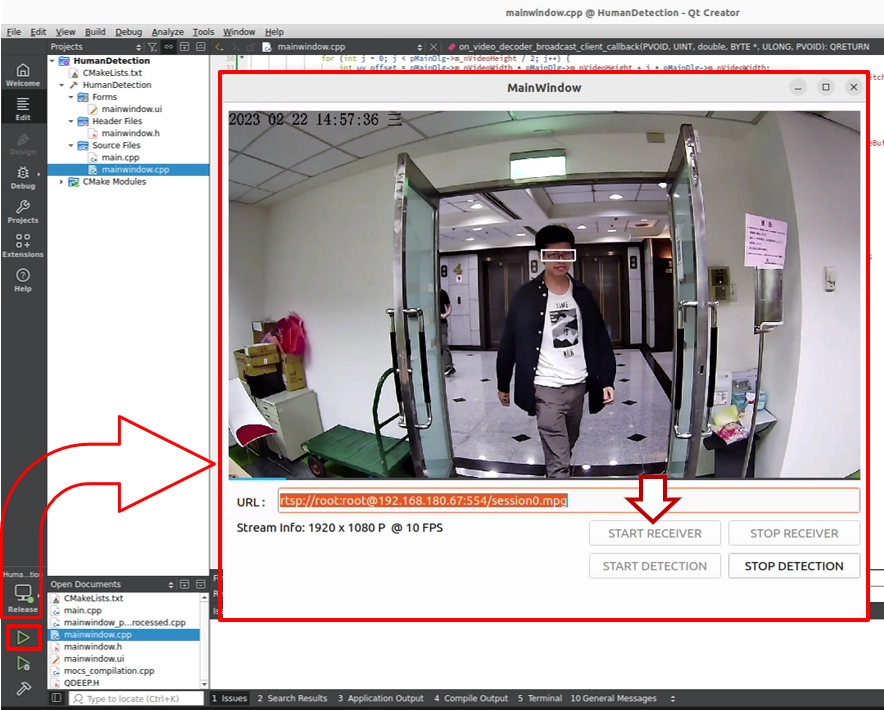
➤ First-run note: The first time you open this software (run the program), the interface may take a little while to appear. This is because we placed the "AI model loading" logic inside the program constructor. During the first run, the model must perform initialization and configuration, and the system is loading the large neural network weight files into the GPU. Once the software opens successfully, it means the AI model is ready in the background. The next time you open the software, this initialization wait will no longer be needed.
This looks exactly like the "human detection" from 10-3, right? Now close the program and go back to the code to make the following change:
1. Change the string in the API to search for a coat: QDEEP_SET_OBJECT_DETECT_CUSTOM_SEARCH_TEXT(., "a coat");
2. Recompile and run.
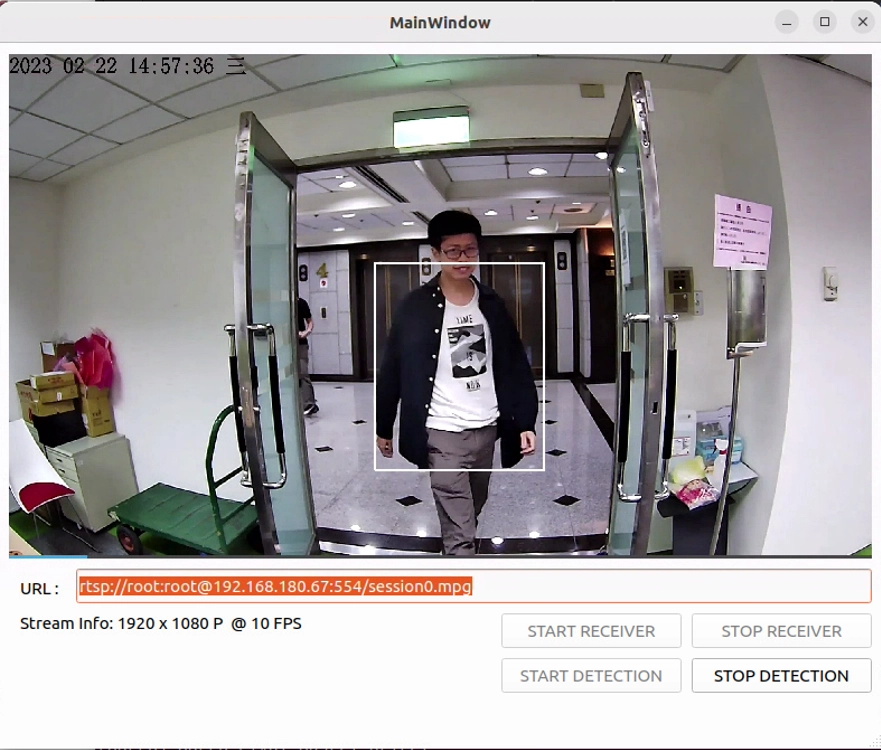
You will find that this model, without being retrained at all, immediately changes its search target and accurately draws a box around the coat in the image.
This is the cutting-edge "Zero-Shot Learning" technology in the field of image AI. Your software is no longer limited by an existing class dictionary. By changing just one line of code, it can recognize almost anything in the world.
Adapted from the original YUAN Developer Hub article. Source ID: 331.