Build a Human Detection Pipeline
What you'll build
The previous guide established an RTSP receiver and an OpenCV rendering path. This guide adds QDEEP object detection to that pipeline.
Through this chapter, you will learn:
-
How to correctly configure and load AI pre-trained model files.
-
Master the core APIs of the "Object Detection" series in the QDEEP engine.
-
Pass uncompressed NV12 frames to the inference engine.
-
Parse the metadata returned by the AI, and use OpenCV to overlay and draw the recognition results (such as tracking bounding boxes and labels) onto the real-time video.
Preparation
Before summoning the AI engine, we must first prepare the trained model files.
-
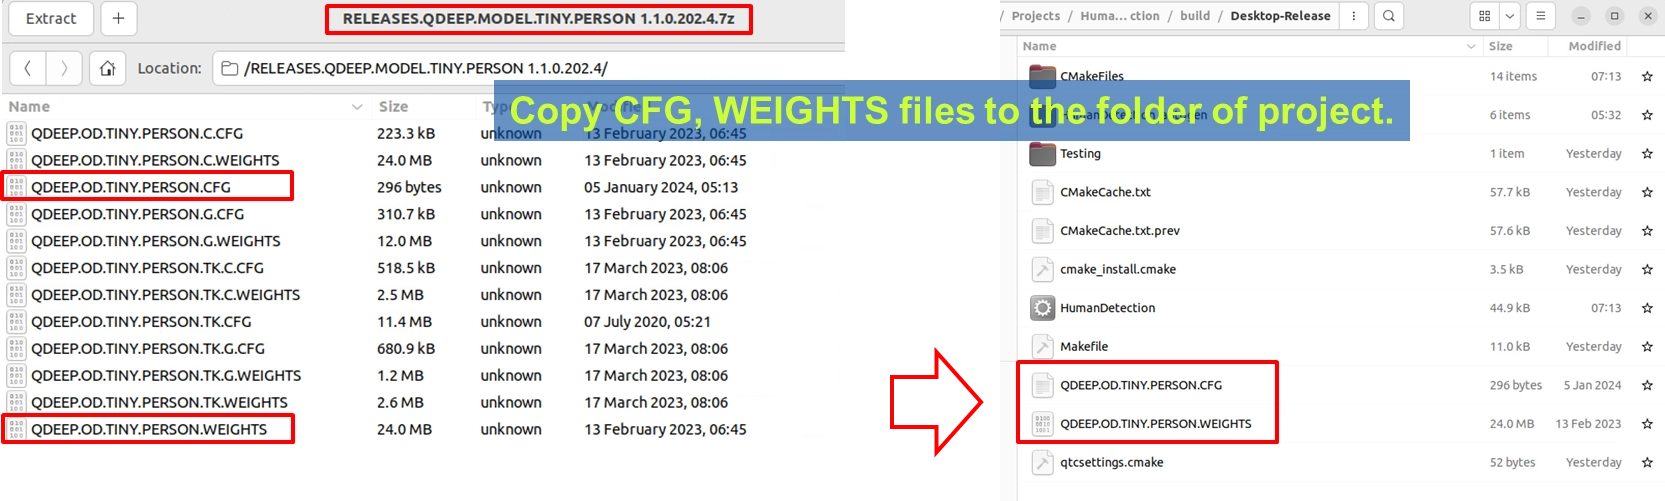
Prepare the Tiny Person human detection model compressed file provided by YUAN (RELEASES.QDEEP.MODEL.TINY.PERSON.).
-
Copy out the extracted QDEEP.OD.TINY.PERSON.CFG (configuration file) and QDEEP.OD.TINY.PERSON.WEIGHTS (weight file).
-
Paste these two files directly into the build output directory of your Qt project (usually inside the build-xxx-Desktop-Release folder, at the same level as the executable file).
Introduction to Core APIs and Structs
To start the QDEEP object detection engine, we also need to divide "getting the image" and "processing the image" into two stages. We will obtain the original uncompressed data (NV12) in the Callback, and then "feed" it to the QDEEP engine for processing.

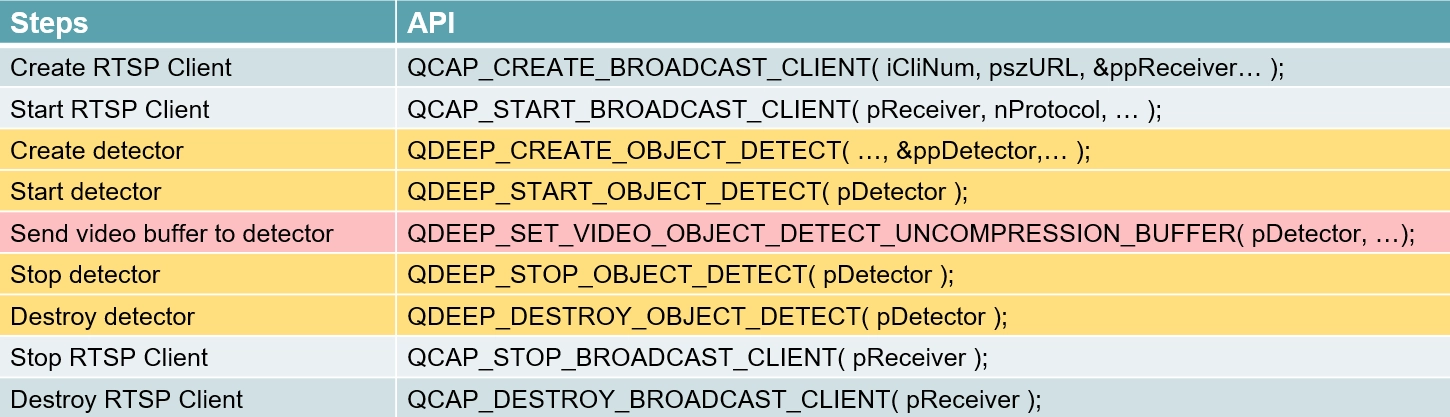
After confirming the model files are in place, the standard sequence of API usage is as follows:
-
QDEEP_CREATE_OBJECT_DETECT: Create the AI detector (and specify the model file to be loaded).
-
QDEEP_START_OBJECT_DETECT: Start the AI detection engine.
-
QDEEP_SET_VIDEO_OBJECT_DETECT_UNCOMPRESSION_BUFFER: Continuously feed the uncompressed video Buffer in the Callback to let the AI perform recognition inference.
-
QDEEP_STOP_OBJECT_DETECT: Stop the AI detection engine.
-
QDEEP_DESTROY_OBJECT_DETECT: Destroy the AI detector and safely release resources.
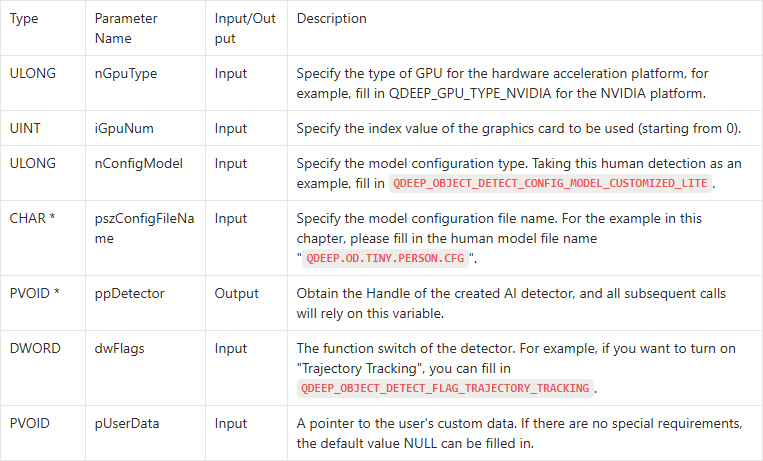
QDEEP_CREATE_OBJECT_DETECT
This is the primary API for creating the AI engine and loading the model. The user must initialize the detector through this API.
QDEEP_START_OBJECT_DETECT
When the model loading is complete, use this API to officially start the inference function of the AI engine.

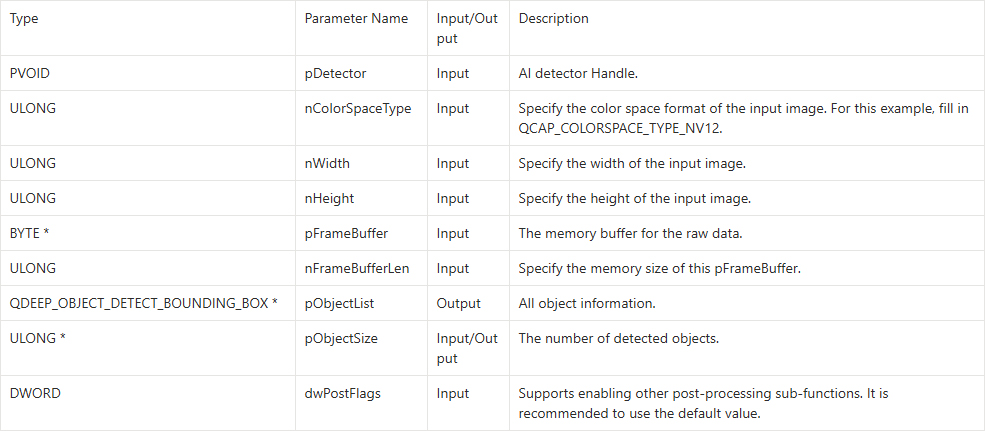
QDEEP_SET_VIDEO_OBJECT_DETECT_UNCOMPRESSION_BUFFER
Pass each unpacked NV12 frame to this API from the callback, then read the detection results returned by the engine.
QDEEP_STOP_OBJECT_DETECT
Use this API to pause the computing of the AI engine.

QDEEP_DESTROY_OBJECT_DETECT
Before the program is completely closed, be sure to call this API to destroy the AI detector and safely release the GPU display memory and system resources.

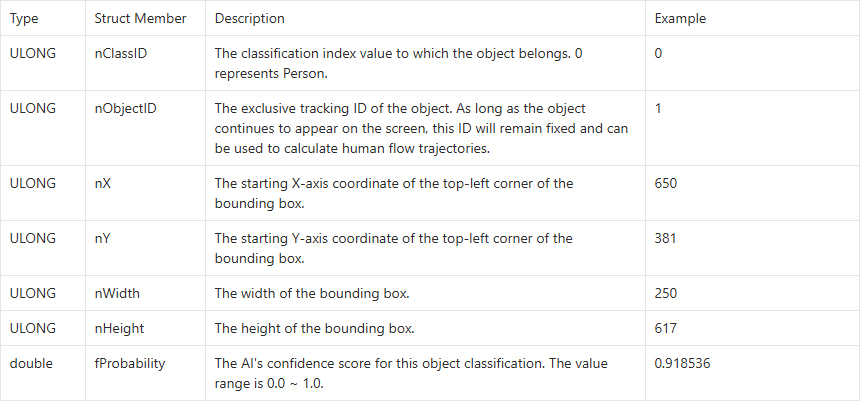
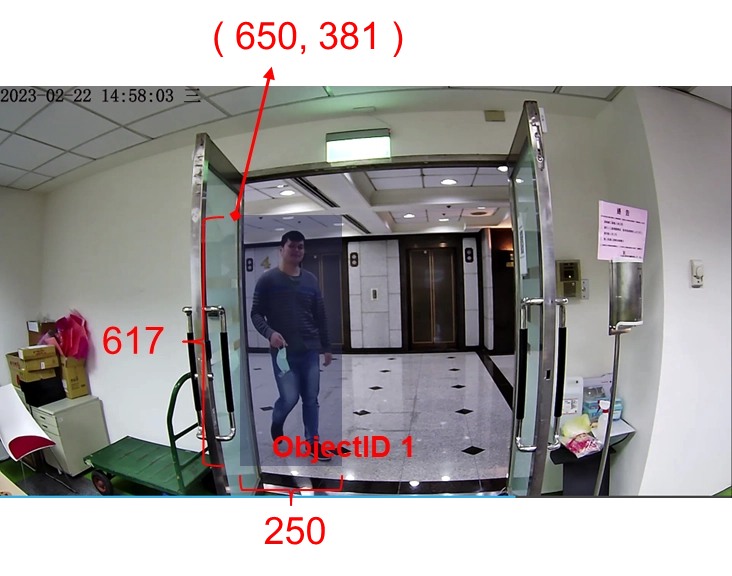
➤ Understanding the QDEEP_OBJECT_DETECT_BOUNDING_BOX Struct
When the AI analysis is completed, in the returned pObjectList array, each element contains the complete information of an object:
Writing Core Code
Now that you have the concepts, open your QDeepSample project. We are ready to inject the soul of AI into the program.
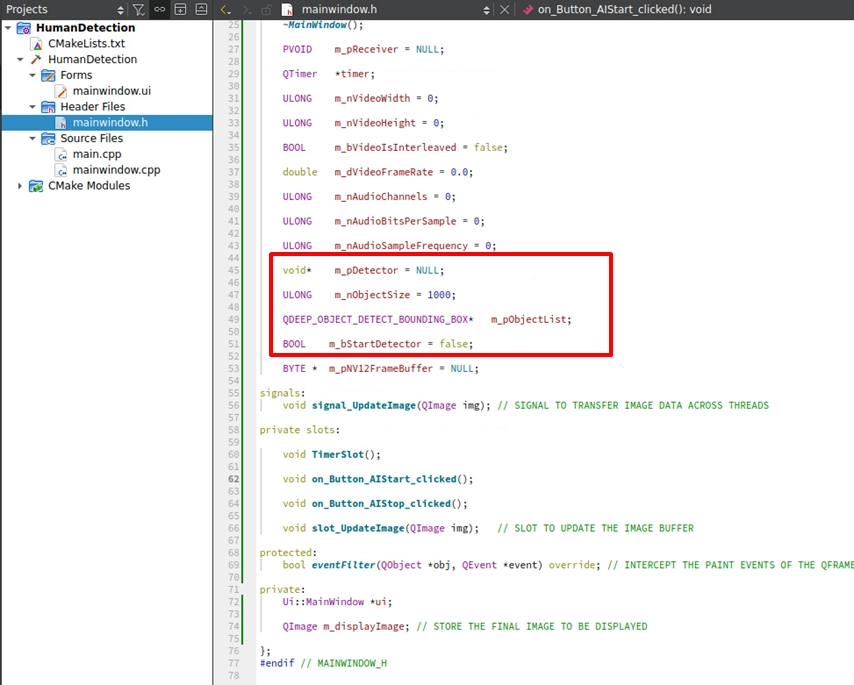
Adding Header File Variables and Initialization
Open mainwindow.h, and in the private: variable section, declare the AI engine Handle, the struct array to store the results, and the boolean value for the control switch:
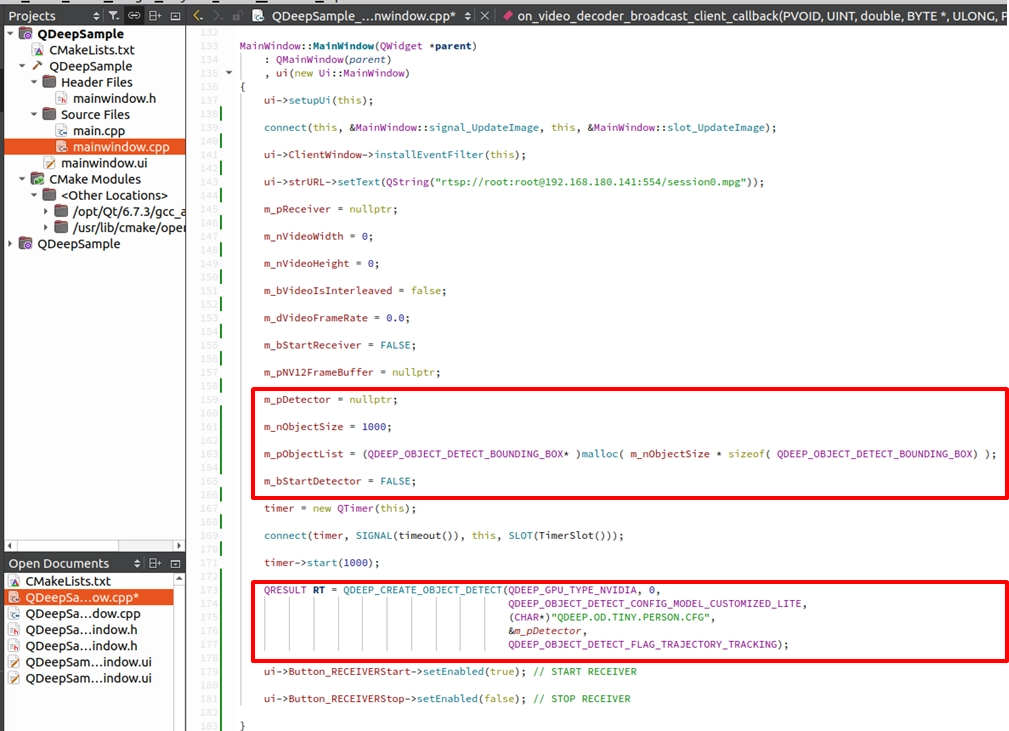
Next, open the constructor MainWindow:MainWindow(.) in mainwindow.cpp. We need to use malloc to allocate memory for the result array and call the API to officially create the AI engine.
Implementing START DETECTION
Find the on_Button_AIStart_clicked() slot function we arranged in the previous chapter. Fill in the API to start the engine and link the button states:
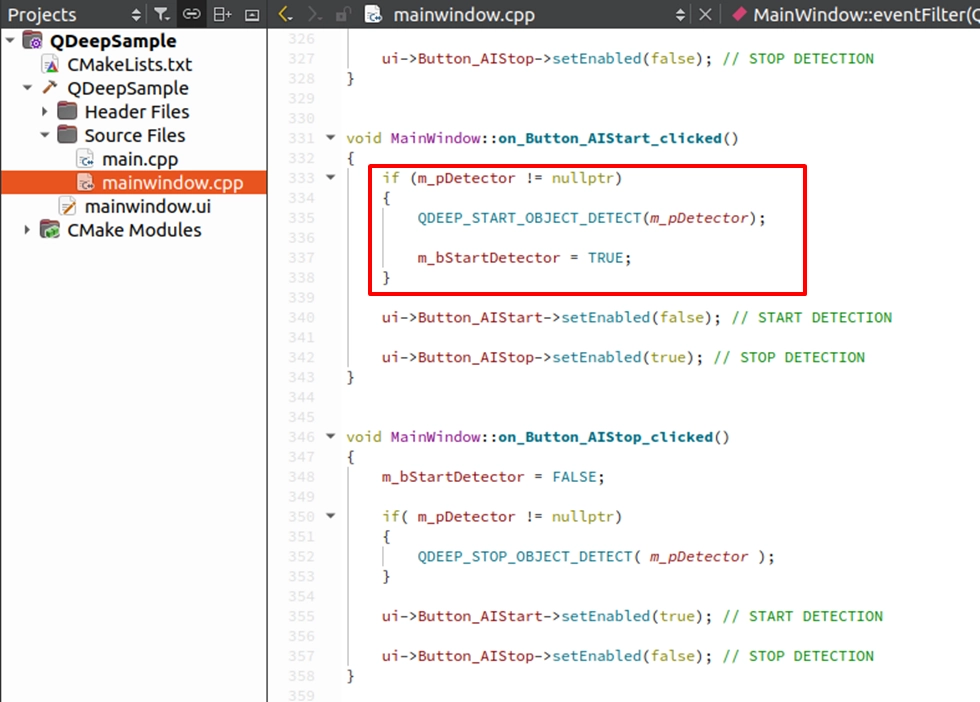
Implementing STOP DETECTION
Find the on_Button_AIStop_clicked() slot function we arranged in the previous chapter. Fill in the API to stop the engine and link the button states:
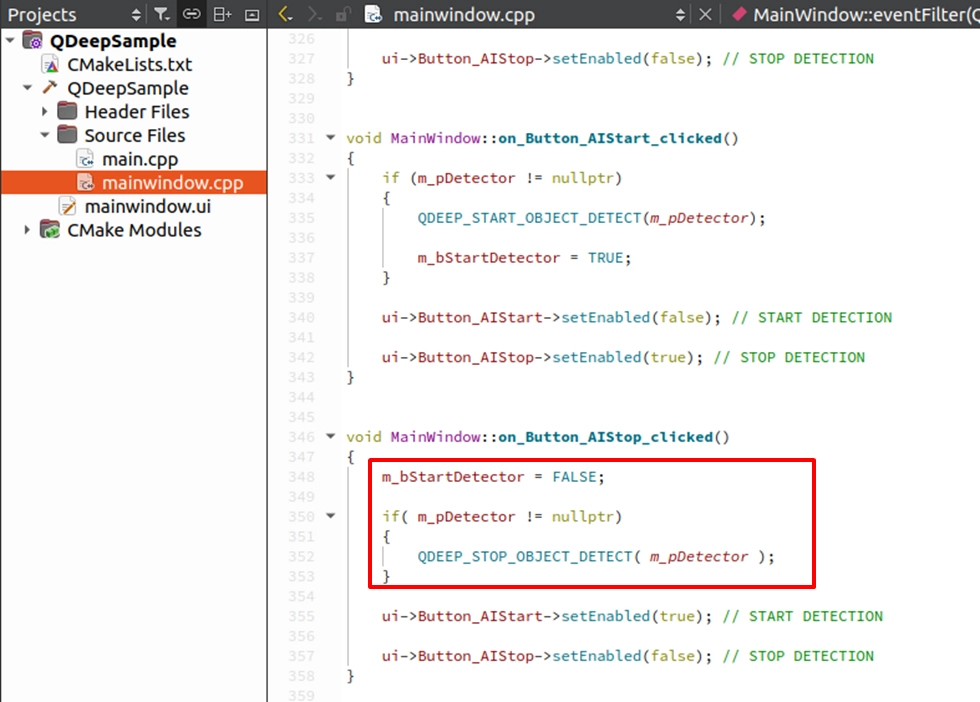
Feeding NV12 Data and Drawing Recognition Results Using OpenCV
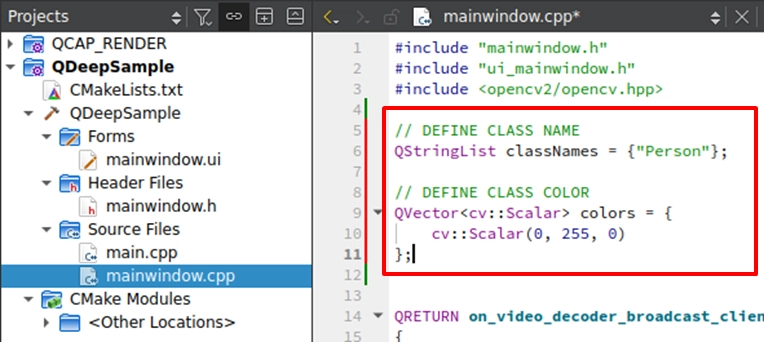
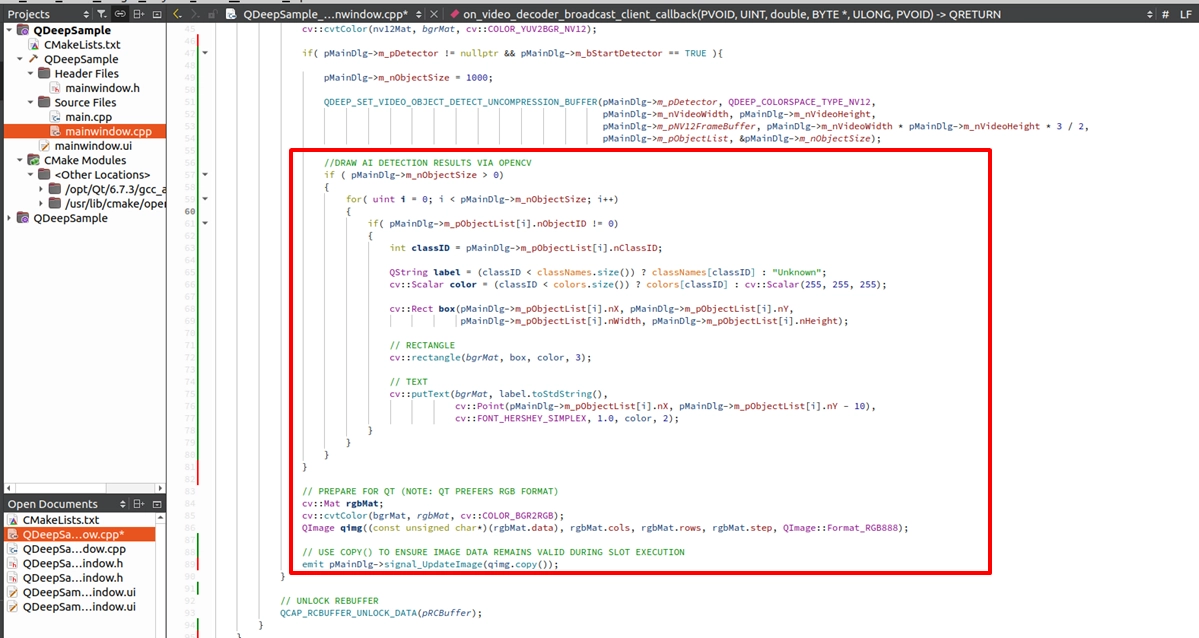
go to the on_video_decoder_broadcast_client_callback function. Right below the OpenCV image conversion logic (cv:cvtColor) we wrote in the previous chapter, we will explain this in three important phases: Phase 1. Establishing a multi-class "label and exclusive color" mapping table: Before drawing, we first declare two arrays in the code: classNames (to store names) and colors (to store colors).
➤ Why use arrays? Because the results returned by the AI will contain an nClassID (class index). We can use this ID to directly find the corresponding name and color in the arrays. Although the human model in this chapter's example will only return 0 (representing Person), such an architecture has clear extension points. In the future, if it is a multi-class model, you only need to expand the definitions in this array (for example, set red for ID:1 and blue for ID:2) to easily achieve the advanced visual effect of "drawing different colored boxes for different objects".
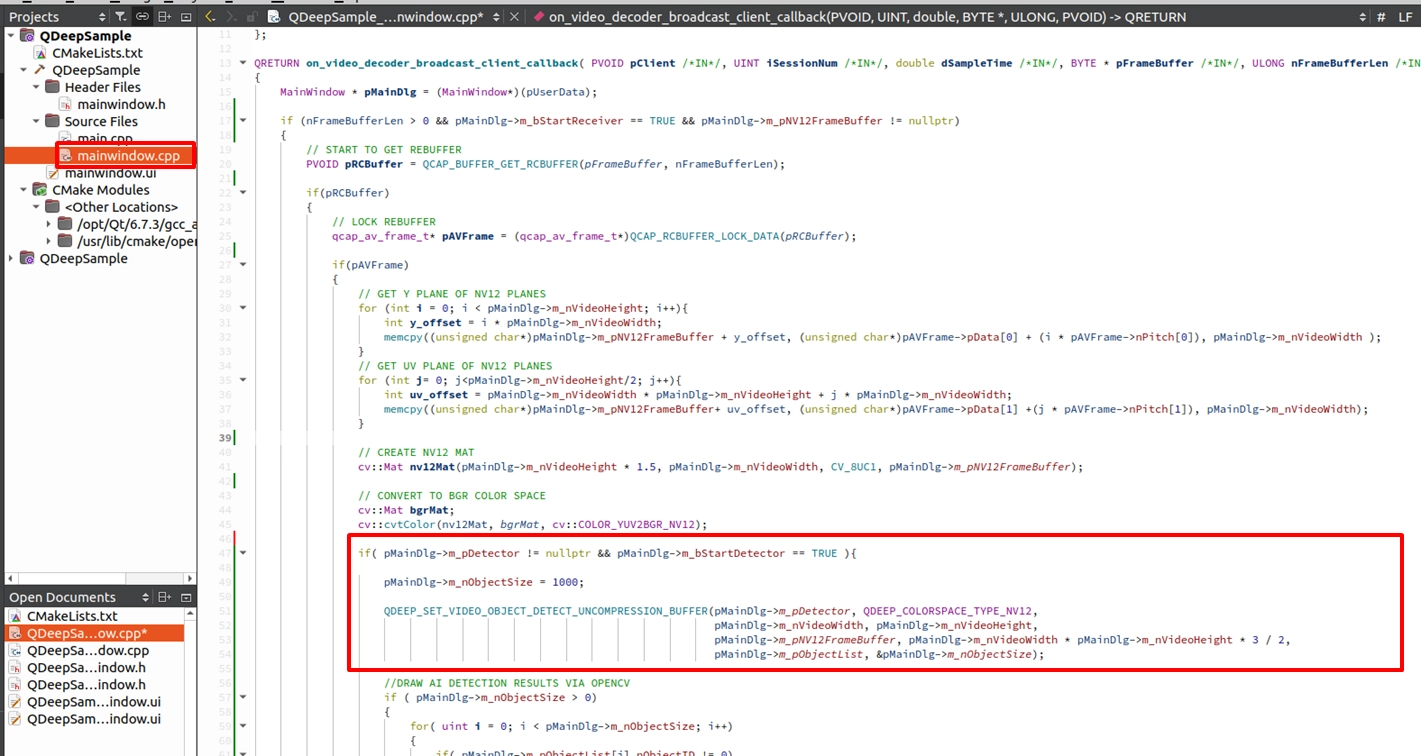
Phase 2. Sending NV12 images to the AI engine: After we obtain the NV12 image buffer through the previous steps, we can send it to the Detector.
➤ Important detail: Before feeding the data to the AI engine, we "must first reset the capacity size of the object list (pMainDlg->m_nObjectSize = 1000)". Because m_nObjectSize is a shared input/output (I/O) parameter. When passed in, it represents "the maximum array capacity we prepared"; after execution, it will be modified by the API to "the actual number of objects detected in that frame". If it is not reset, this value will become smaller and smaller (for example, if only 2 people were detected in the previous frame, the capacity will be changed to 2), causing subsequent frames to be unable to accommodate new objects and resulting in errors.
Phase 3. Parsing multiple object locations and overlaying text and bounding boxes: After obtaining the object information from the API, we can use OpenCV's drawing APIs to accurately mark these objects. Facing multiple objects that may appear on the screen at the same time, we must use a loop (for-loop) to traverse m_pObjectList to obtain the location of each object one by one. Next, we not only need to draw a rectangular tracking box on the screen but also overlay text on top of the object to clearly indicate the object's label and its exclusive tracking ID.
Safe Exit Before Program Closure
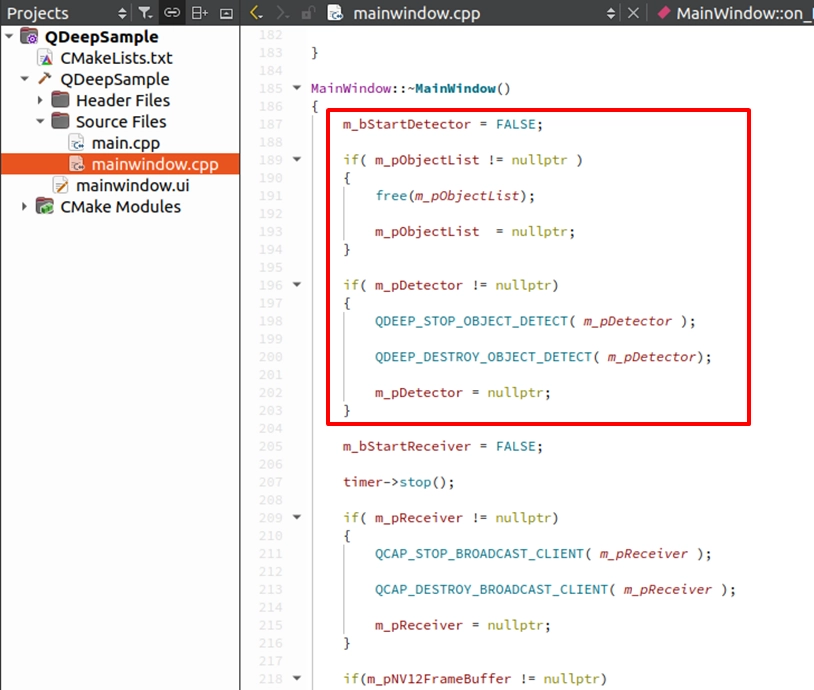
Finally, in the destructor ~MainWindow(), add the API to release AI model resources and the action to free memory. This ensures that no GPU load remains when the window is closed.
Final Verification
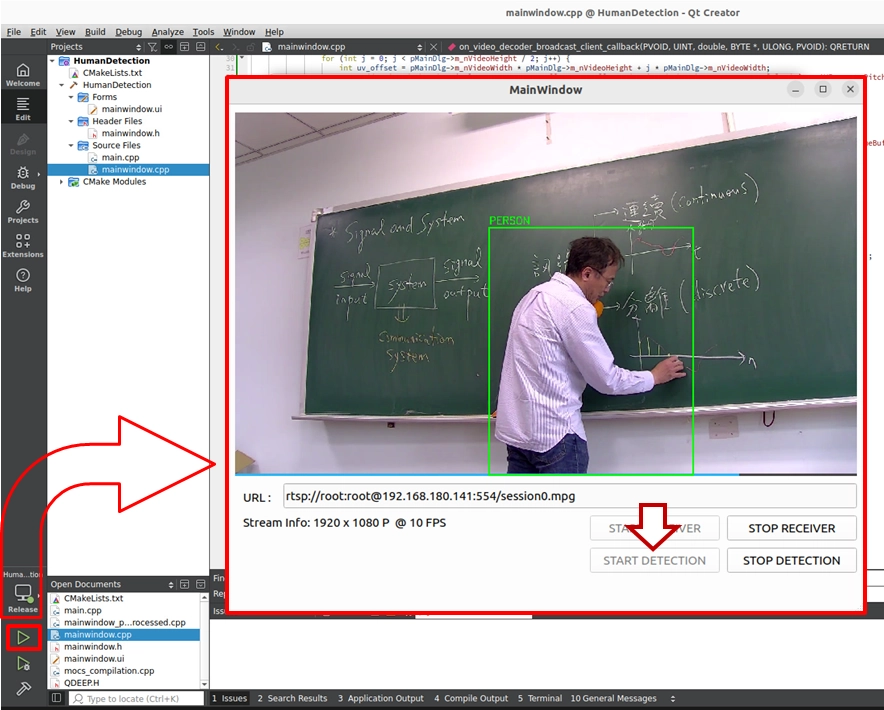
The test passed. You have successfully completed your first AI visual analysis project equipped with the Object Detection function. Now, click "Build and RUN" in the bottom left corner to execute the project, and verify the result.
On the software interface, you will see four carefully arranged buttons. Please operate them in the following order:
-
START RECEIVER: Clicking this will start the network stream. At this time, a pure, real-time image without AI processing will be displayed on the screen.
-
START DETECTION: After confirming the video is smooth, click this button to start the AI analysis. At this moment, the program will officially awaken the QDEEP engine.
After you click START DETECTION, each detected person is marked with a green bounding box and a Person label.
➤ First-run note: At the moment you open this software (execute the program) for the first time, the interface may take a moment to display. This is because we wrote the logic for "loading the AI model" inside the program's constructor. The model must undergo initialization configuration during its first execution, at which point the system loads the massive neural network weight files into the GPU. As long as the software opens successfully (first loading completed), it means the AI model is ready in the background. Subsequently, when you open the software again, you will no longer need this initialization waiting time.
-
STOP DETECTION: Click this button when you want to turn off the AI, and the screen will immediately return to a pure video feed without recognition bounding boxes.
-
STOP RECEIVER: End the test and stop the network stream.
In the next chapter, we will show you how powerful this architecture is, we don't even need to change the core code, just replace the "model files (CFG/WEIGHTS)" and expand the "color and label arrays" declared in the previous section, and this program can instantly evolve into a "Face, Head, and Body Multi-Object Recognition System".
Adapted from the original YUAN Developer Hub article. Source ID: 325.