9-6 Video/Audio Recording Example Tutorial
This section covers the next stage of practical development. In the previous chapters, we have successfully displayed the video smoothly on the canvas and mastered the device status and snapshot features through Callbacks. But what if we want to completely preserve this dynamic video and audio process? This brings us to another core area of the NexVDO SDK: "Record".
Recording high-quality videos ( such as 1080p60 ) typically consumes a significant amount of CPU resources, leading to system stuttering. To solve this problem, we will call upon the SDK's underlying operation in the upcoming implementation: GPU Hardware Encoding Acceleration. Through the NVENC engine on the NVIDIA Jetson platform, we can compress raw video into high-quality H.264 + AAC MP4 files in real-time with low CPU usage.
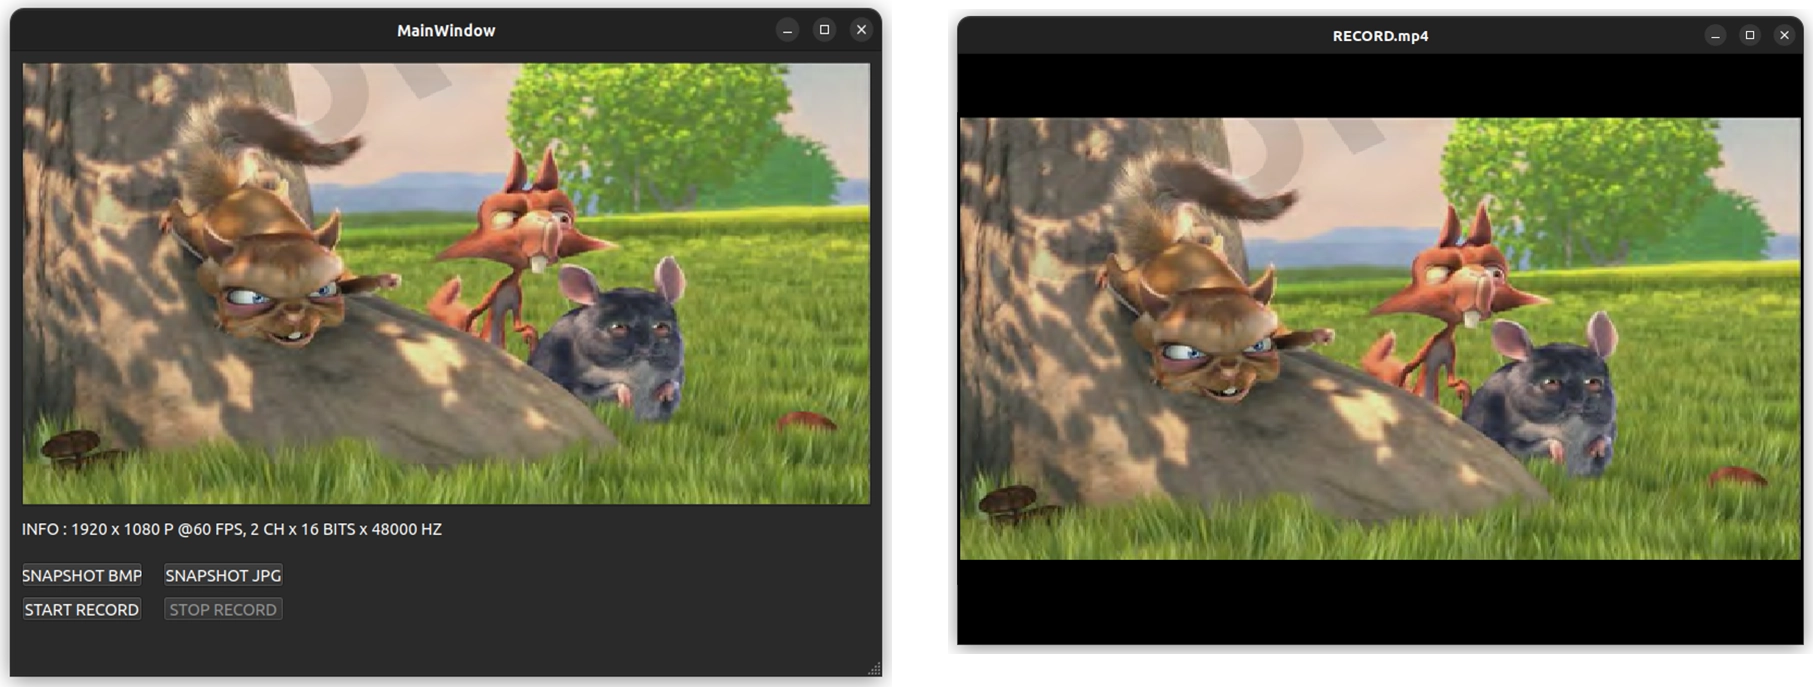 © Blender Foundation | Big Buck Bunny | CC BY 3.0
Understanding Core APIs - Video/Audio Recording
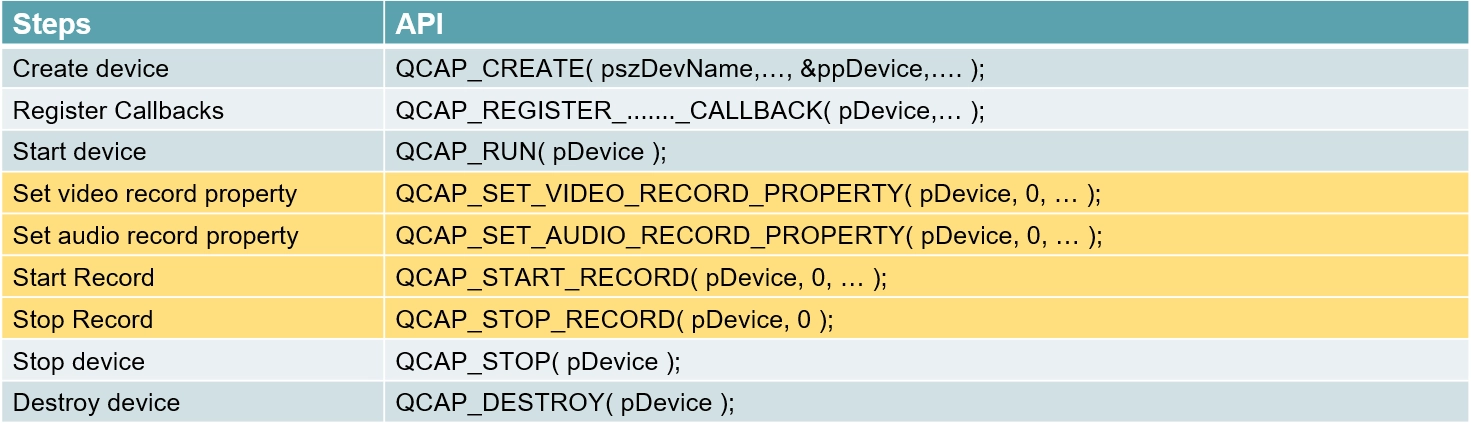
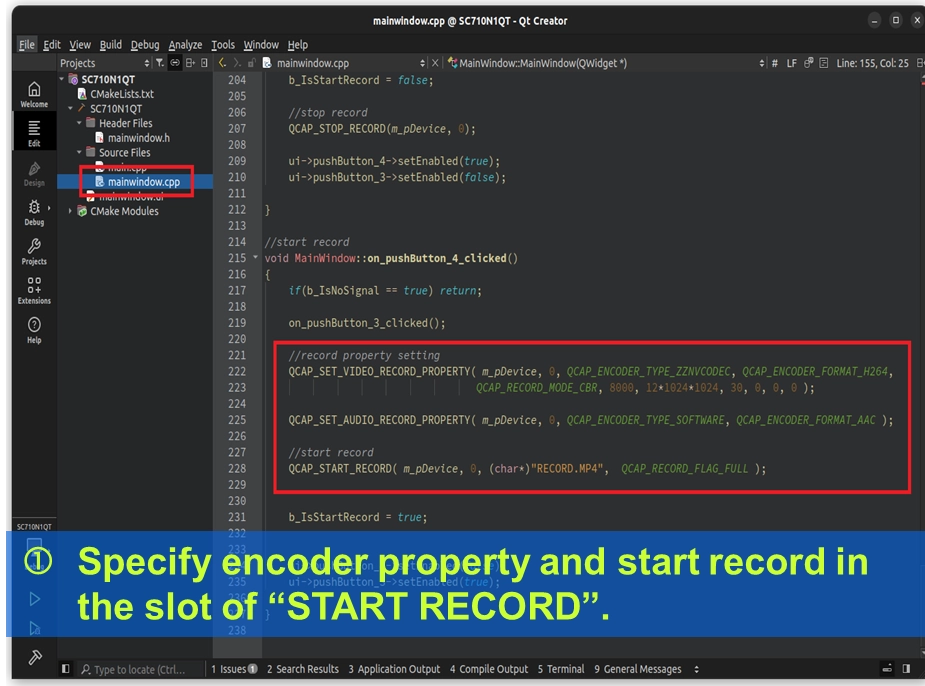
To achieve recommended hardware-accelerated recording, we don't need to delve into complex codec algorithms. Once a signal is detected, simply call the following 4 core APIs in sequence to set the "encoding properties" and issue the "start/stop" commands:
 1. QCAP_SET_VIDEO_RECORD_PROPERTY:Set video recording properties.
2. QCAP_SET_AUDIO_RECORD_PROPERTY:Set audio recording properties.
3. QCAP_START_RECORD:Start recording.
4. QCAP_STOP_RECORD:Stop recording.
1. QCAP_SET_VIDEO_RECORD_PROPERTY:Set video recording properties.
2. QCAP_SET_AUDIO_RECORD_PROPERTY:Set audio recording properties.
3. QCAP_START_RECORD:Start recording.
4. QCAP_STOP_RECORD:Stop recording.
Unlocking low-level capabilities: Multi-Format Support and Multi-Stream Recording
Before starting to set detailed parameters, we must first understand the two core advantages of the NexVDO SDK recording engine:
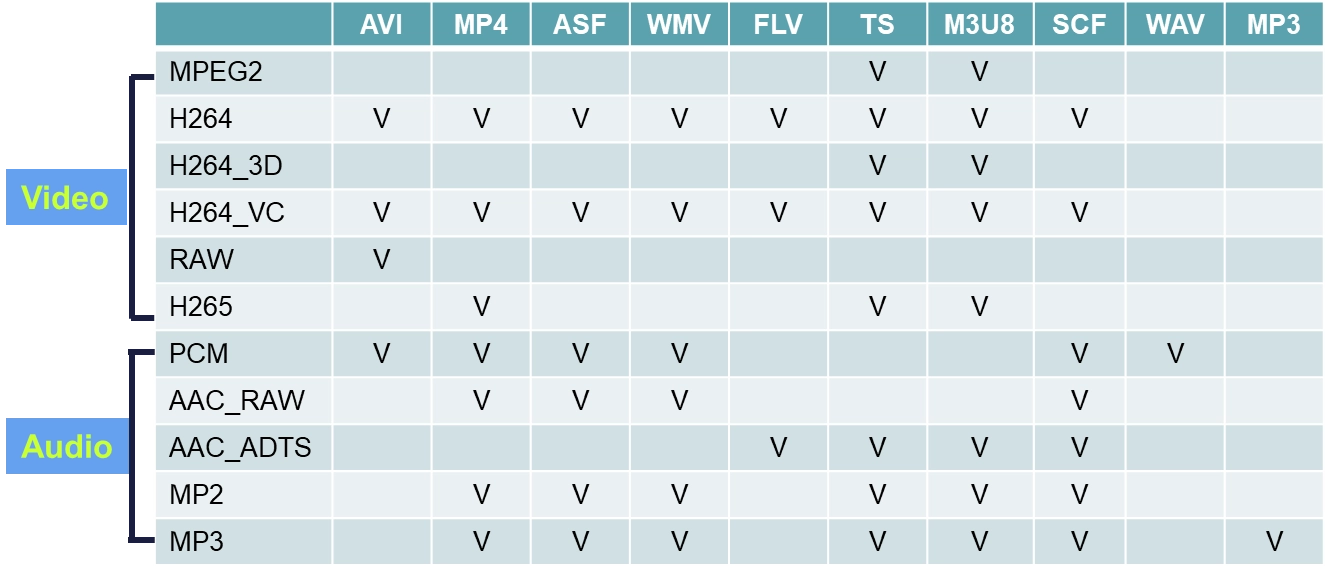
1. Rich Audio/Video Container Formats and Encoding Matrix Whether your project requires standard MP4, TS streams used in professional broadcasting, or web-friendly M3U8/FLV formats, the SDK has already cleared the path for you at the underlying level. Based on the following formats, developers can freely combine video and audio codecs with extreme flexibility:
- Video Encoding ( Video ): Supports mainstream H.264, MPEG2, and even RAW and H.264_3D formats.
- Audio Encoding ( Audio ): Supports AAC ( RAW / ADTS ), PCM, MP2, and MP3.
- Container Format: Can package the above encodings into various mainstream formats such as AVI, MP4, ASF, WMV, FLV, TS, and M3U8.
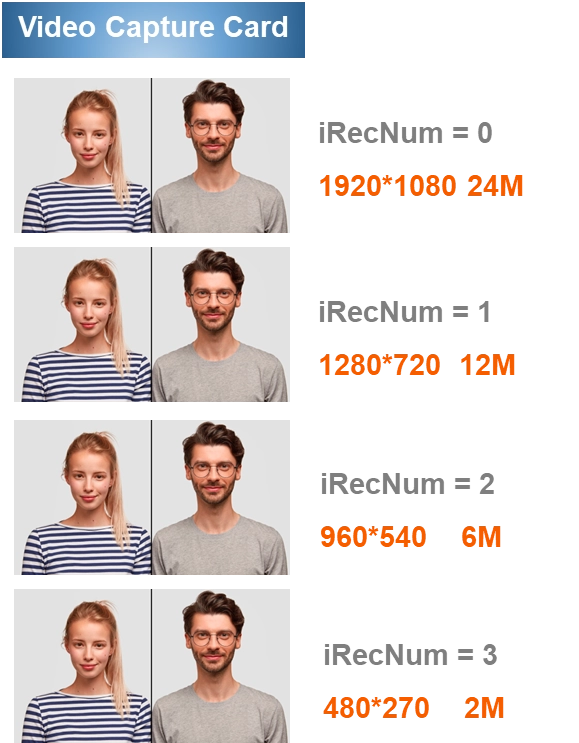
2. Multi-Stream Recording In application scenarios like security surveillance or high-end broadcasting, we often need to record a "high-resolution archive file" and a "low-resolution preview file" simultaneously. Through the SDK's exclusive multi-stream technology, the same capture card supports opening up to 4 independent recording channels simultaneously ( corresponding to iRecNum 0~3 in the parameters later ). For example, you can apply different settings to the same signal simultaneously via the API:
- Channel 0 ( iRecNum = 0 ): Record in 1920×1080 high quality ( 24Mbps ) for local high-definition storage.
- Channel 1 ( iRecNum = 1 ): Record in 1280×720 medium quality ( 12Mbps ) for general playback.
- Channels 2 and 3 ( iRecNum = 2 / 3 ): Record in smaller resolutions such as 960×540 ( 6Mbps ) or 480×270 ( 2Mbps ) for real-time monitoring on remote mobile devices with low bandwidth.
After understanding the calling sequence, Proceed to a detailed parameter breakdown for these specific recording APIs:
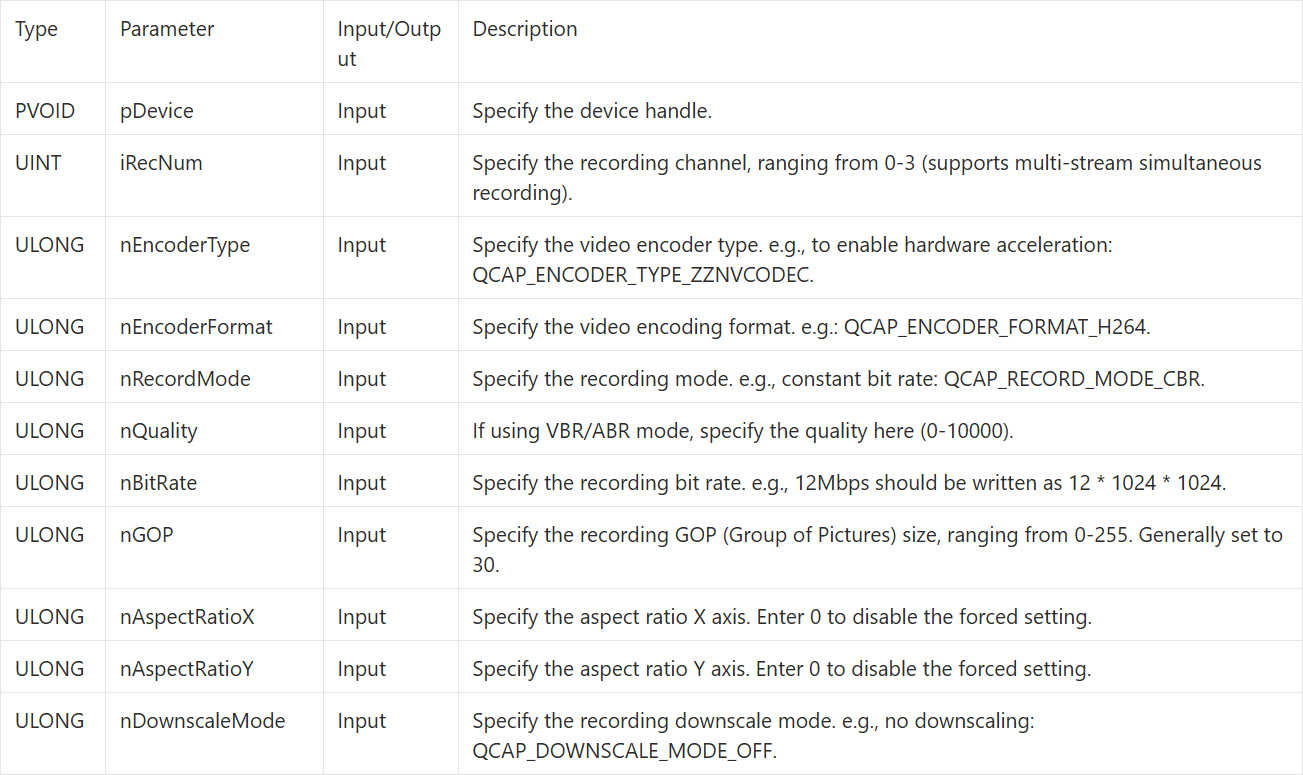
QCAP_SET_VIDEO_RECORD_PROPERTY
This is the most core API determining the recording quality and performance. You must set these properties before starting the recording.
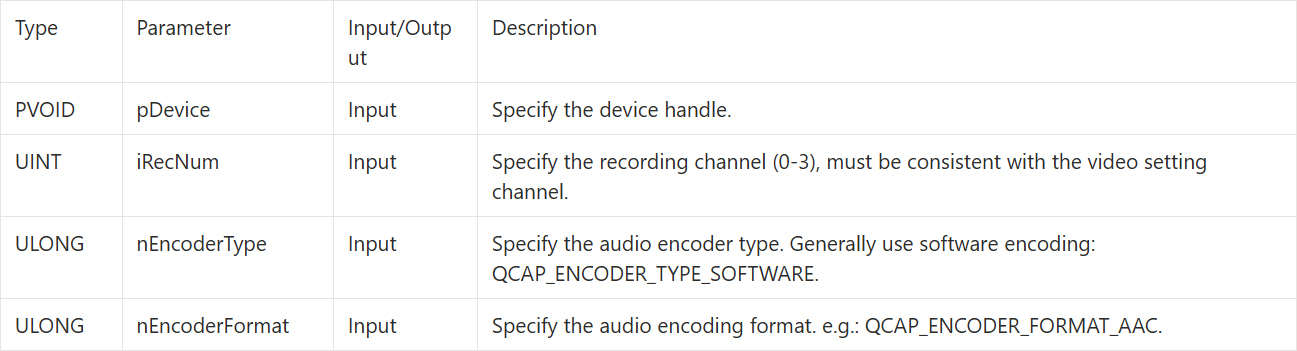
QCAP_SET_AUDIO_RECORD_PROPERTY
After the video is set up, the next step is to set the audio encoding format.
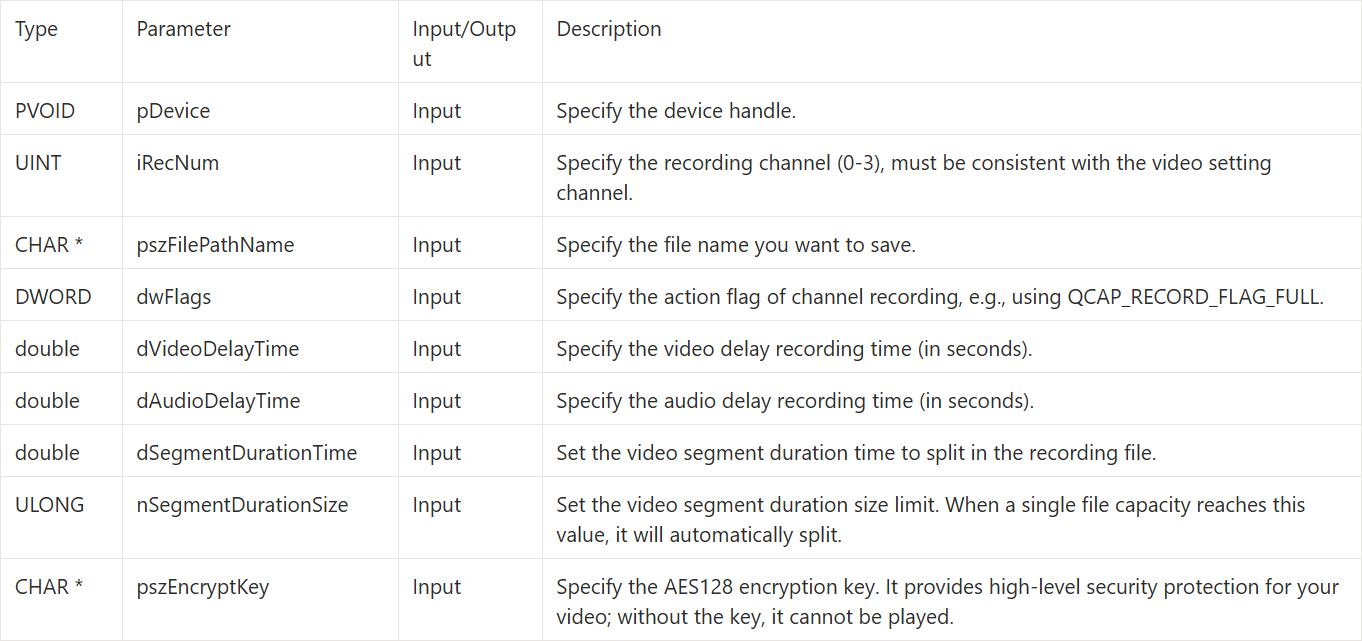
QCAP_START_RECORD
After completing the codec settings, we can officially start the recording engine through this API.
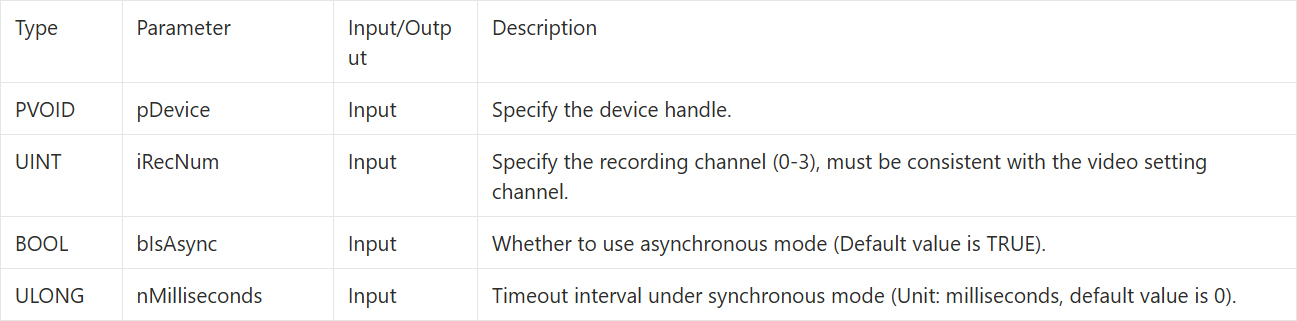
QCAP_STOP_RECORD
When you need to end the recording, call this API, and the SDK will automatically stop and safely package the MP4 file.
Building the UI Display Interface
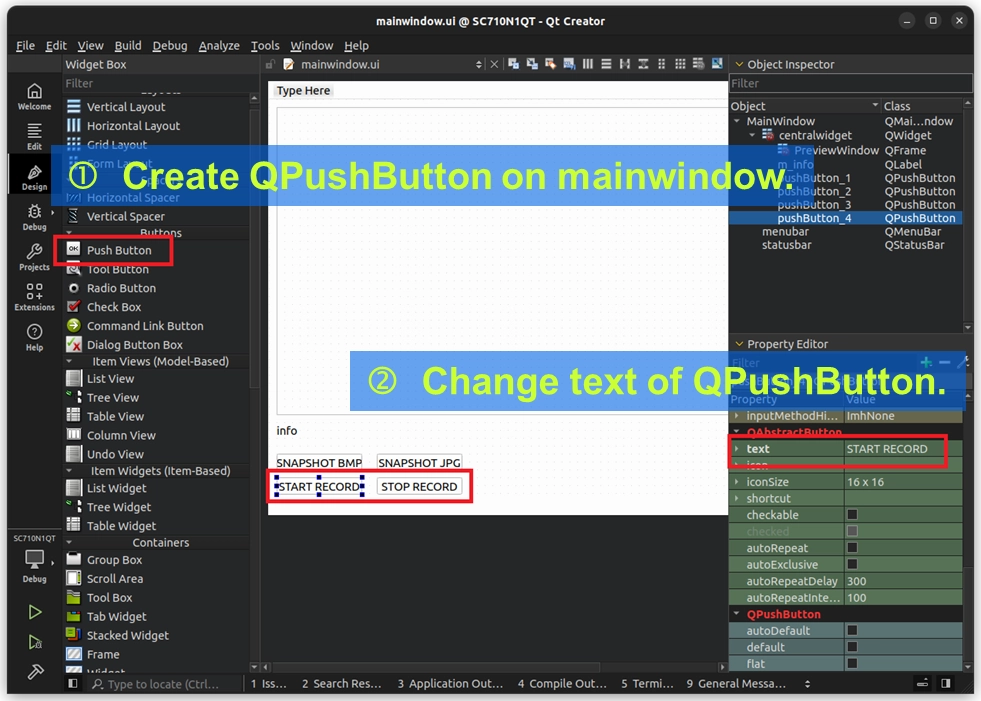
Here, we will directly reuse the Callback and Image Snapshot Example we already built in Chapter 9-5. Next, we need to first prepare the "Start Recording" and "Stop Recording" control buttons on the screen.
1. Please double-click to open mainwindow.ui in the project to enter Design mode. 2. Drag and drop two QPushButton components from the left toolbar onto the screen. 3. In the property panel on the right, change the text of these two buttons to "START RECORD" and "STOP RECORD", respectively.
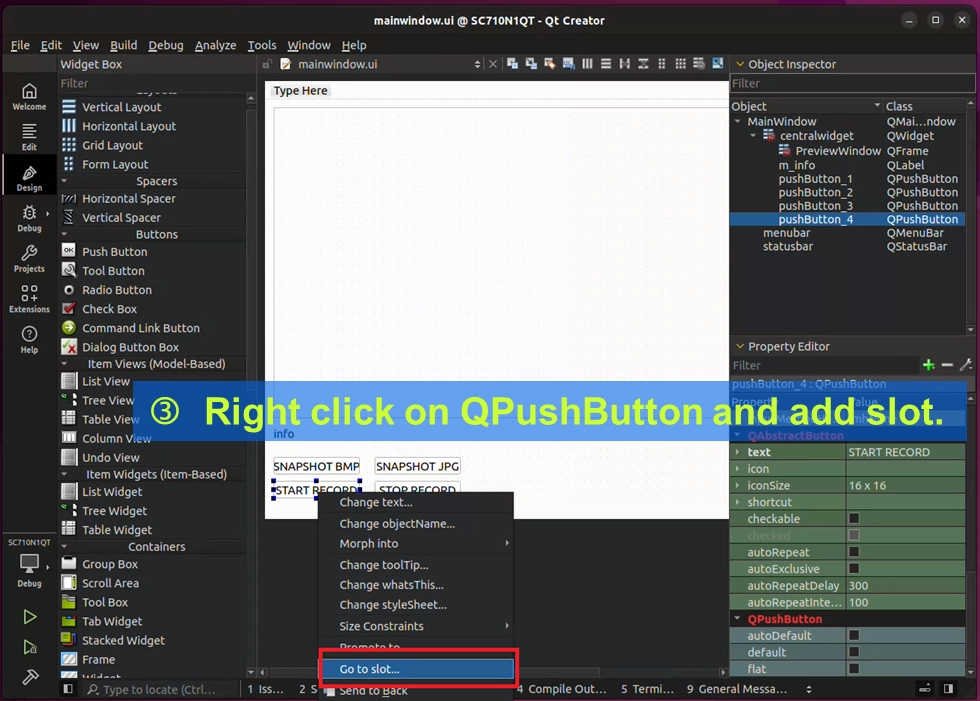
4. Right-click on each of these two buttons, select "Go to slot.", and create the code blocks for their click events.
Writing the Core Code
Here, we will directly reuse the Callback and Image Snapshot example already built in Chapter 9-5. With the above buttons ready, please switch back to the code editing mode, and follow us step-by-step to write the core logic for recording:
Adding a "Fool-Proofing Gate" to the Buttons
With this line of code, as long as there is currently no signal, the button will directly return without executing any underlying APIs, protecting our program.
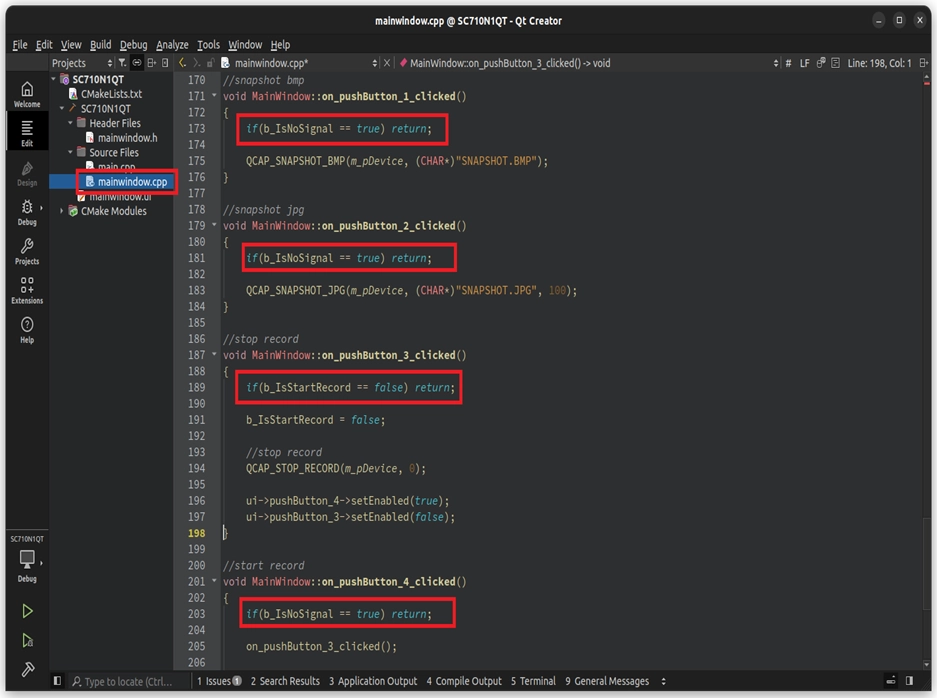
Next, based on the API sequence we learned earlier, write down this core code that combines GPU hardware encoding acceleration:
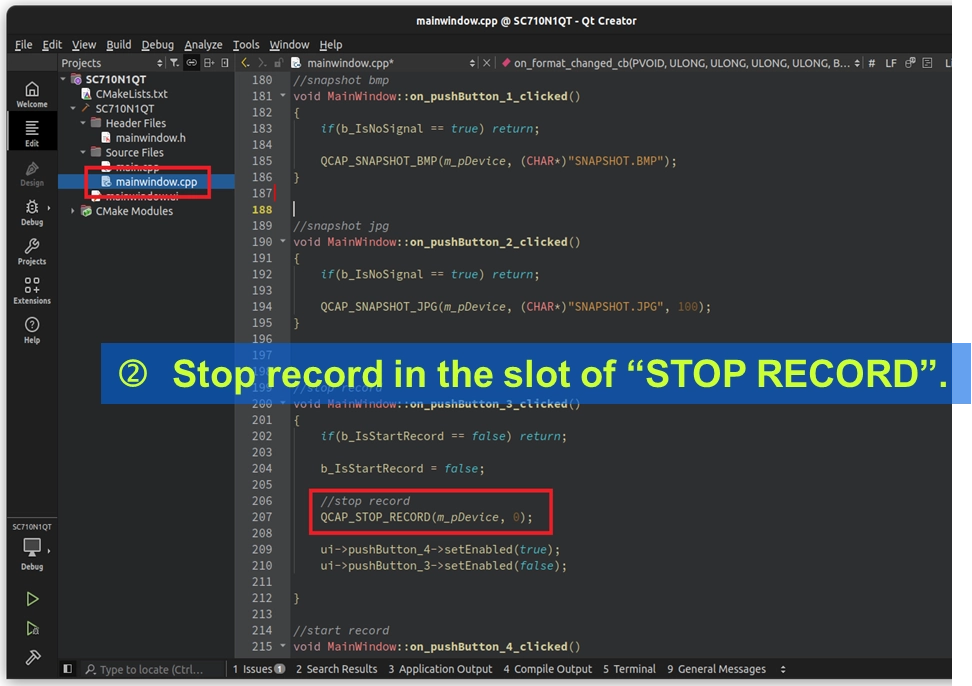
With this discussion, readers will instantly understand that the Callbacks in 9-5 and the recording in 9-6 are closely connected.
Final Verification
The code writing is complete. test your first hardware-encoded recording program.
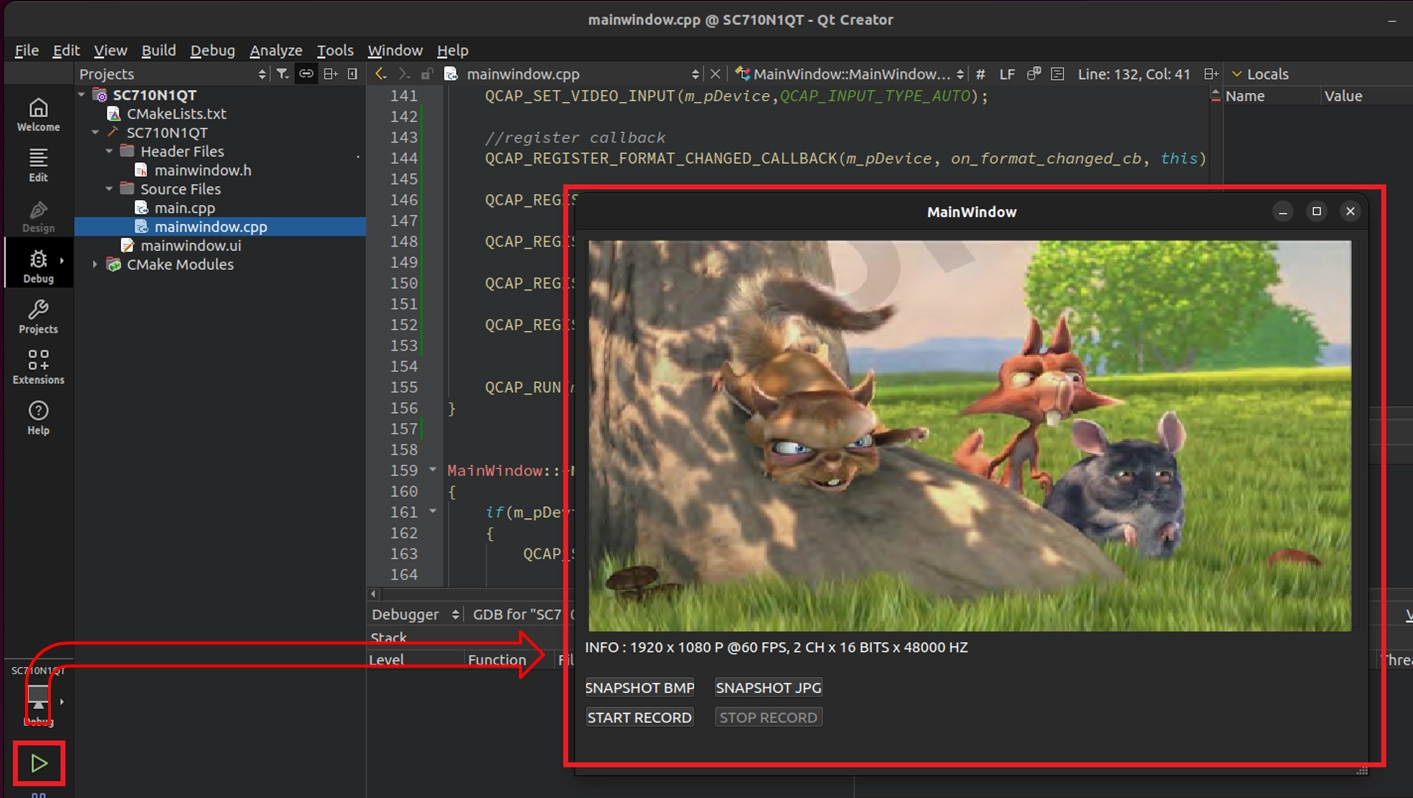
1. Click the green triangle "Run" button at the bottom left of Qt Creator. 2. After the captured video is displayed smoothly, click "START RECORD". Wait a few seconds to a few minutes, then click "STOP RECORD".
 © Blender Foundation | Big Buck Bunny | CC BY 3.0
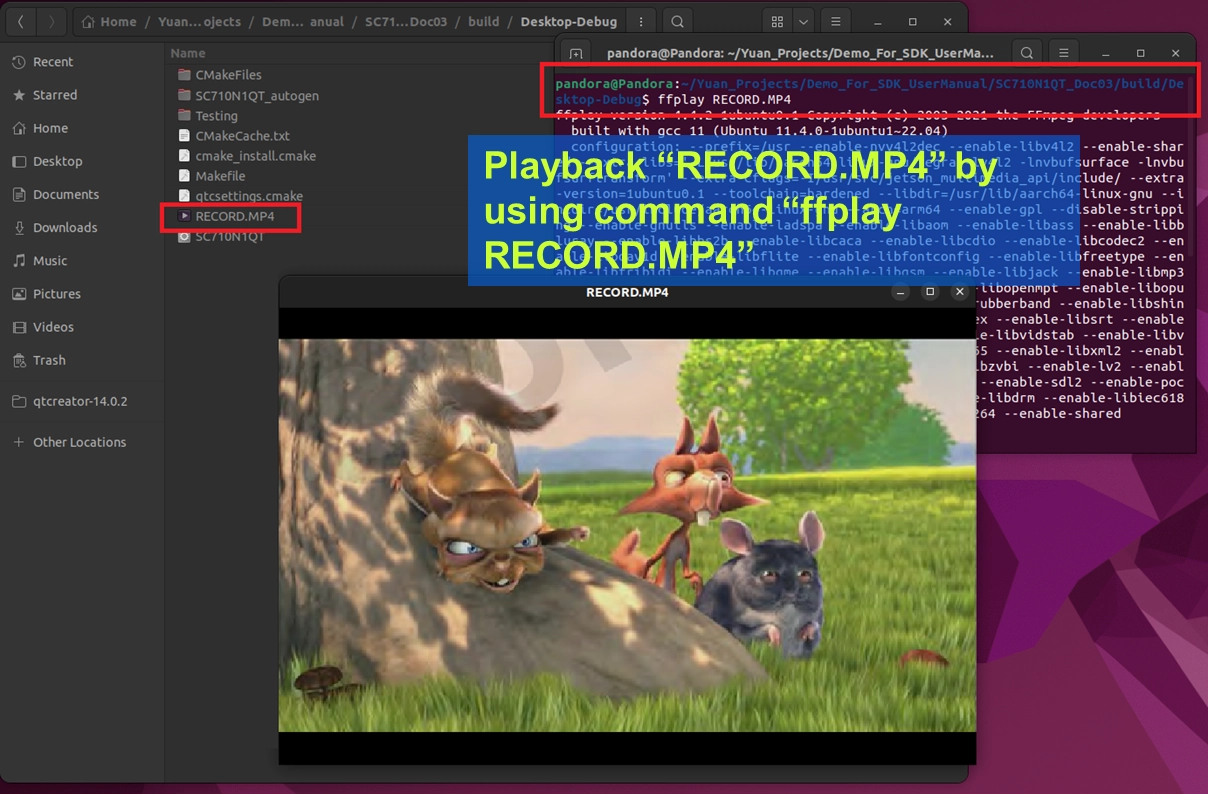
3. Verify the Recording File: In the Linux environment, we can use the terminal to play the newly recorded high-definition MP4 file.
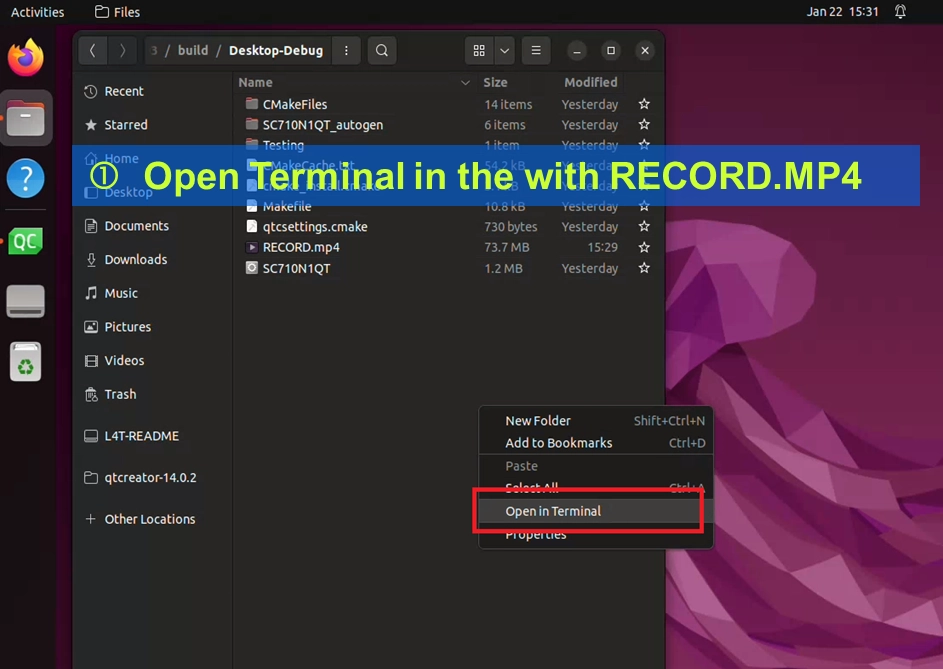
- Right-click on the project's build folder ( which is where RECORD.MP4 is saved ), and select "Open in Terminal".
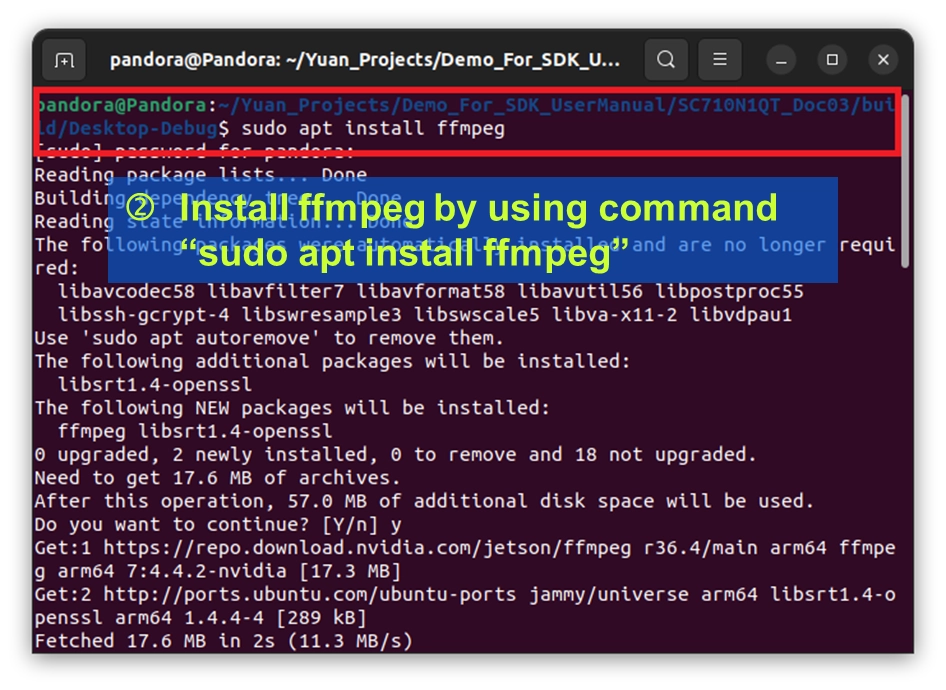
- Enter the command to install the lightweight player ffmpeg:sudo apt install ffmpeg.
- Enter the command to play the video:ffplay RECORD.MP4.
 © Blender Foundation | Big Buck Bunny | CC BY 3.0
If you successfully saw the smooth video you just recorded in the pop-up playback window, and heard the audio, The test passed. You have unlocked the high-performance video and audio recording feature of the NexVDO SDK.
Adapted from the original YUAN Developer Hub article. Source ID: 319.