5-5 Adding to Your Images
Draw Lines on an Image
OpenCV drawing functions let you annotate frames, visualize detections, and generate simple overlays without leaving the image-processing pipeline. Start with cv.line, which draws a straight segment between two points.
The signatures below follow the official OpenCV drawing functions reference.
cv.line: draw a line segment
Pass the source image, start and end coordinates, a BGR color, and optional line settings.
Signature
The Python binding uses this signature:
cv.line(img, pt1, pt2, color[, thickness[, lineType[, shift]]]) -> img
pt1 and pt2 are (x, y) coordinates. color is normally a BGR tuple, thickness is measured in pixels, lineType controls rasterization, and shift specifies fractional bits in the point coordinates. The function modifies and returns img.
Example: draw a red diagonal line
The following code will draw a red line from the top-left to the bottom-right corner of an image.
import cv2 as cv
# Set the path to the original image file.
# Don't forget to replace 'Pandora.png' with your own image!
file_path = "Pandora.png"
# Read the image using OpenCV's imread function.
source_picture = cv.imread(file_path)
# Check if the image was loaded successfully.
if source_picture is None:
    print("Warning: Could not load the image.")
    print(f"Please check if the path is correct: {file_path}")
else:
    # --- Create a "canvas copy" of the image ---
    # We create a "copy" of the original image called `modified_image`.
    # This way, when we draw on `modified_image`,
    # we don't affect the original `source_picture`.
    # You'll be able to see a side-by-side comparison of the original and
    # the modified image!
    modified_image = source_picture.copy()
    # --- Draw a red line segment on the image! ---
    # The cv.line function will draw a line on `modified_image`.
    # (0, 0): The starting point of the line, which is the top-left corner of the image.
    # (1024, 344): The ending point of the line. This will depend on your image size.
    #              You can try changing it to
    #              (modified_image.shape[1]-1, modified_image.shape[0]-1)
    #              to draw a corner-to-corner diagonal line.
    # (0, 0, 255): The color of the line. In OpenCV's BGR format, this is pure red.
    # 2: The thickness of the line, set to 2 pixels wide here.
    cv.line(modified_image, (0, 0), (1024, 344), (0, 0, 255), 2)
    # --- Image display loop ---
    # Enter an infinite loop to continuously display the image windows.
    while True:
        # Display the original image.
        cv.imshow("Original Picture", source_picture)
        # Display the image with the line drawn on it.
        cv.imshow("Picture with Line", modified_image) # Clearer window name!
        # The cv.waitKey(1) function pauses the program for
        # 1 millisecond to check for a key press.
        key = cv.waitKey(1)
        # If the ESC key (number 27) is pressed, exit the loop and end the display.
        if key & 0xFF == 27:
            break
    # --- Release resources ---
    # Finally, close all image windows created by OpenCV to free up computer resources.
    cv.destroyAllWindows()
Program Result:
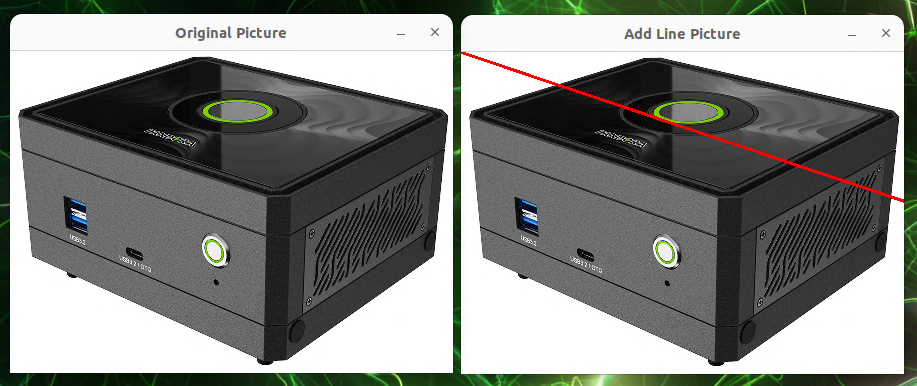
The example opens the original image beside a copy containing the red line.
Common uses include:
- Marking boundaries, vectors, or regions of interest.
- Building geometric overlays from multiple segments.
- Visualizing measurements and algorithm output.
Change pt1, pt2, color, or thickness to experiment with placement and appearance.
Draw Rectangles
Use cv.rectangle to outline a detection, highlight a region of interest, or draw a filled rectangular overlay.
cv.rectangle: draw a rectangular region
Define two opposite corners, then provide the color and optional line settings.
Signature
The Python binding uses this signature:
cv.rectangle(img, pt1, pt2, color[, thickness[, lineType[, shift]]]) -> img
pt1 and pt2 identify opposite corners. Set thickness to a positive pixel width for an outline or use cv.FILLED to fill the rectangle. The function modifies and returns img.
Example: draw a blue rectangle
The following code will draw a blue rectangle on an image.
import cv2 as cv
# Set the path to the original image file.
file_path = "Pandora.png"
# Read the image using OpenCV's imread function.
source_picture = cv.imread(file_path)
# Check if the image was loaded successfully.
if source_picture is None:
    print(f"Warning: Couldn't load the image. Please check the path: {file_path}")
else:
    # --- Create a "canvas copy" of the image ---
    # We create a "copy" of the original image called `modified_image`.
    # This way, when we draw on `modified_image`,
    # we don't affect the original `source_picture`.
    # You'll be able to see a side-by-side comparison of the original and
    # the modified image!
    modified_image = source_picture.copy()
    # --- Draw a blue rectangle on the image! ---
    # The cv.rectangle function will draw a box on `modified_image`.
    # (30, 30): The top-left corner's coordinate (x=30, y=30).
    # (30 + 632, 30 + 200): The bottom-right corner's coordinate.
    #    This means starting from the top-left corner,
    #    it extends 632 pixels to the right and 200 pixels down.
    #    So the actual bottom-right coordinate is (662, 230).
    # (255, 0, 0): The color of the rectangle's border.
    # In OpenCV's BGR format, this is pure blue.
    # 8: The thickness of the border, set to 8 pixels wide here.
    cv.rectangle(modified_image, (30, 30), (30 + 632, 30 + 200),
                 (255, 0, 0), 8)
    # --- Image display loop ---
    # Enter an infinite loop to continuously display the image windows.
    while True:
        # Display the original image.
        cv.imshow("Original Picture", source_picture)
        # Display the image with the rectangle drawn on it.
        cv.imshow("Picture with Rectangle", modified_image) # Clearer window name!
        # The cv.waitKey(1) function pauses the program for
        # 1 millisecond to check for a key press.
        key = cv.waitKey(1)
        # If the ESC key (number 27) is pressed, exit the loop and end the display.
        if key & 0xFF == 27:
            break
    # --- Release resources ---
    # Finally, close all image windows created by OpenCV to free up computer resources.
    cv.destroyAllWindows()
Program Result:
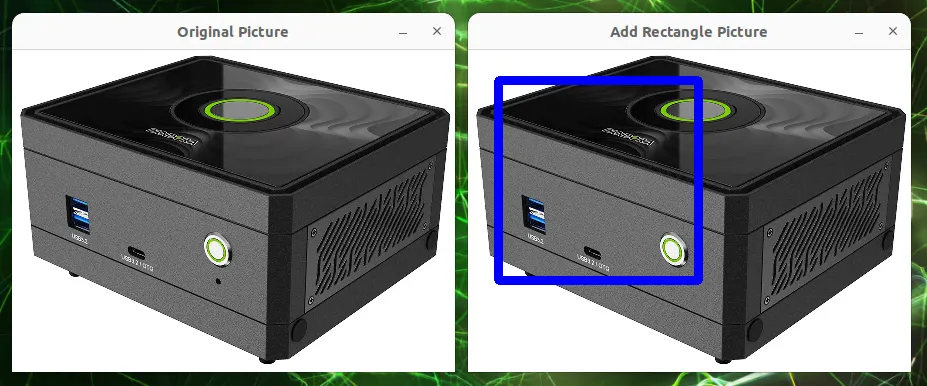
The example opens the original image beside a copy containing the blue rectangle.
Common uses include:
- Drawing bounding boxes around detected objects.
- Highlighting regions of interest.
- Creating simple interface or status overlays.
Change pt1, pt2, color, or thickness to test different positions and styles.
Draw Circles
Use cv.circle to mark keypoints, centers, round objects, or target locations.
cv.circle: draw a circle
Provide the center coordinate, radius, BGR color, and optional line settings.
Signature
The Python binding uses this signature:
cv.circle(img, center, radius, color[, thickness[, lineType[, shift]]]) -> img
Set thickness to a positive pixel width for an outline or use cv.FILLED for a solid circle. The function modifies and returns img.
Example: draw a green circle
The following code will draw a magenta ellipse on an image.
import cv2 as cv
# Set the path to the original image file.
file_path = "Pandora.png"
# Read the image using OpenCV's imread function.
source_picture = cv.imread(file_path)
# Check if the image was loaded successfully.
if source_picture is None:
    print("Warning: Could not load the image.")
    print(f"Please check if the path is correct: {file_path}")
else:
    # --- Create a "canvas copy" of the image ---
    # We create a "copy" of the original image called `modified_image`.
    # This way, when we draw on `modified_image`,
    # we don't affect the original `source_picture`.
    # You'll be able to see a side-by-side comparison of the original and
    # the modified image!
    modified_image = source_picture.copy()
    # --- Draw a green circle on the image! ---
    # The cv.circle function will draw a circle on `modified_image`.
    # (410, 172): The center's coordinate (x=410, y=172).
    # 50: The radius of the circle, set to 50 pixels here.
    # (0, 255, 0): The color of the circle's border. In OpenCV's BGR format,
    # this is pure green.
    # 5: The thickness of the border, set to 5 pixels wide here.
    cv.circle(modified_image, (410, 172), 50, (0, 255, 0), 5)
    # --- Image display loop ---
    # Enter an infinite loop to continuously display the image windows.
    while True:
        # Display the original image.
        cv.imshow("Original Picture", source_picture)
        # Display the image with the circle drawn on it.
        cv.imshow("Picture with Circle", modified_image) # Clearer window name!
        # The cv.waitKey(1) function pauses the program for
        # 1 millisecond to check for a key press.
        key = cv.waitKey(1)
        # If the ESC key (number 27) is pressed, exit the loop and end the display.
        if key & 0xFF == 27:
            break
    # --- Release resources ---
    # Finally, close all image windows created by OpenCV to free up computer resources.
    cv.destroyAllWindows()
Program Result:
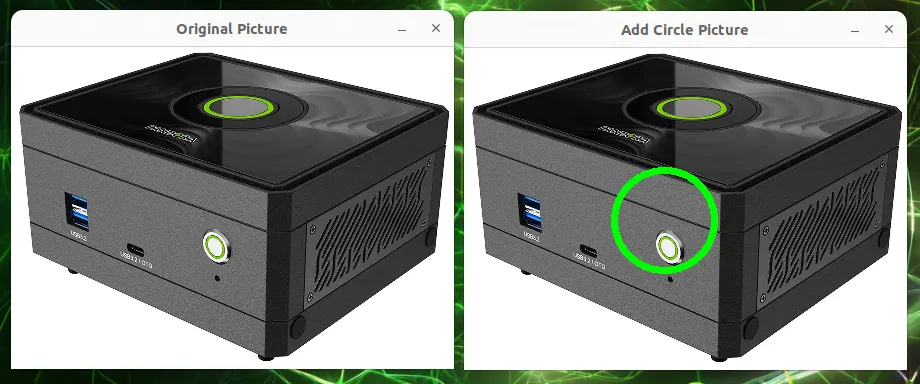
The example opens the original image beside a copy containing the green circle.
Common uses include:
- Marking keypoints, eyes, or round objects.
- Showing target or tracking coordinates.
- Visualizing radii and distance thresholds.
Change center, radius, color, or thickness to test different placements and styles.
Draw Ellipses
Use cv.ellipse when a circle does not accurately represent the object or region you need to annotate. You can control the center, axis lengths, rotation, arc range, color, and line style.
cv.ellipse: draw an elliptic arc
An ellipse requires a center point, half-axis lengths, a rotation angle, and start and end angles. Use 0 and 360 for the arc angles to draw a complete ellipse.
Signature
The Python binding uses this signature:
cv.ellipse(img, center, axes, angle, startAngle, endAngle, color[, thickness[, lineType[, shift]]]) -> img
axes contains the horizontal and vertical half-axis lengths. angle rotates the ellipse, while startAngle and endAngle select the portion of the arc to render. The function modifies and returns img.
Example: draw a rotated magenta ellipse
The following code will draw a magenta ellipse on an image.
import cv2 as cv
# Set the path to the original image file.
file_path = "Pandora.png"
# Read the image using OpenCV's imread function.
source_picture = cv.imread(file_path)
# Check if the image was loaded successfully.
if source_picture is None:
    print(f"Warning: Couldn't load the image. Please check the path: {file_path}")
else:
    # --- Create a "canvas copy" of the image ---
    # We create a "copy" of the original image called `modified_image`.
    # This way, when we draw on `modified_image`,
    # we don't affect the original `source_picture`.
    # You'll be able to see a side-by-side comparison of the original and the
    # modified image!
    modified_image = source_picture.copy()
    # --- Draw a magenta ellipse on the image! ---
    # The cv.ellipse function will draw an ellipse on `modified_image`.
    # (650, 172): The center's coordinate (x=650, y=172).
    # (100, 130): The half-axis lengths of the ellipse.
        #             This means the horizontal half-axis is 100 pixels long and
        #             the vertical is 130.
    #             (Note: The order here is (x-axis radius, y-axis radius),
    #             not necessarily major/minor, it depends on the `angle`.)
    # 90: The rotation angle of the ellipse, set to 90 degrees counter-clockwise here.
    # 0: The starting angle for drawing, starting from 0 degrees.
    # 360: The ending angle, ending at 360 degrees, which means a full ellipse is drawn.
    # (255, 0, 255): The color of the ellipse's border. In OpenCV's BGR format,
    # this is magenta.
    # 5: The thickness of the border, set to 5 pixels wide here.
    cv.ellipse(modified_image, (650, 172), (100, 130), 90, 0, 360,
               (255, 0, 255), 5)
    # --- Image display loop ---
    # Enter an infinite loop to continuously display the image windows.
    while True:
        # Display the original image.
        cv.imshow("Original Picture", source_picture)
        # Display the image with the ellipse drawn on it.
        cv.imshow("Picture with Ellipse", modified_image) # Clearer window name!
        # The cv.waitKey(1) function pauses the program for
        # 1 millisecond to check for a key press.
        key = cv.waitKey(1)
        # If the ESC key (number 27) is pressed, exit the loop and end the display.
        if key & 0xFF == 27:
            break
    # --- Release resources ---
    # Finally, close all image windows created by OpenCV to free up computer resources.
    cv.destroyAllWindows()
Program Result:
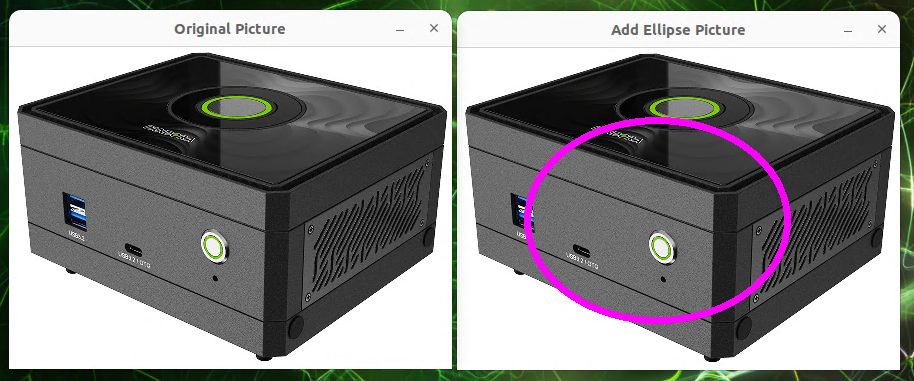
The example opens the original image beside a copy containing the rotated magenta ellipse.
Common uses include:
- Approximating elongated or rotated objects.
- Visualizing fitted contours and orientation.
- Drawing partial arcs by changing the start and end angles.
Change center, axes, angle, color, or thickness to test different geometries and styles.
Draw Polylines and Polygons
Use cv.polylines to connect a sequence of vertices. It works for open paths as well as closed polygons, making it useful for irregular regions and custom overlays.
cv.polylines: connect multiple vertices
Pass one or more arrays of points and use isClosed to control whether OpenCV connects the final vertex back to the first.
Signature
The Python binding uses this signature:
cv.polylines(img, pts, isClosed, color[, thickness[, lineType[, shift]]]) -> img
pts is a sequence of point arrays. Set isClosed to True for polygons or False for open paths. The function modifies and returns img.
Example: draw a yellow pentagon
The following code will draw a yellow pentagon on an image.
import cv2 as cv
import numpy as np # We need NumPy to handle the point coordinates
# Set the path to the original image file.
file_path = "Pandora.png"
# Read the image using OpenCV's imread function.
source_picture = cv.imread(file_path)
# Check if the image was loaded successfully.
if source_picture is None:
    print("Warning: Could not load the image.")
    print(f"Please check if the path is correct: {file_path}")
else:
    # --- Create a "canvas copy" of the image ---
    # We create a "copy" of the original image called `modified_image`.
    # This way, when we draw on `modified_image`,
    # we don't affect the original `source_picture`.
    # You'll be able to see a side-by-side comparison of the original and
    # the modified image!
    modified_image = source_picture.copy()
    # --- Define the "vertices" coordinates of the polygon ---
    # These points will be connected in order to form the sides of the polygon.
    # The coordinates must be of integer type (np.int32).
    pts = np.int32([
        [285, 215], # First point
        [354, 175], # Second point
        [415, 227], # Third point
        [381, 300], # Fourth point
        [305, 295]  # Fifth point
    ])
    # --- Adjust the data format of the points ---
    # The polylines function expects the points to be in a format like this:
    # [[[x1,y1]], [[x2,y2]], ...].
    # So we need to use the reshape function to adjust the point array.
    # `(-1, 1, 2)` means:
    #   -1: Let NumPy automatically calculate the number of points.
    #   1: Treat each point group as a separate array
    #      (used for drawing multiple disconnected polygons).
    #   2: Each point has two coordinates, x and y.
    pts = pts.reshape((-1, 1, 2))
    # --- Draw a yellow polygon on the image! ---
    # The cv.polylines function will draw a polygon on `modified_image`.
    # `[pts]`: Here we wrap `pts` in square brackets to indicate
    #          we have only one polygon to draw.
    # `True`: `isClosed` is set to True, which means the last point will
    #         be connected to the first,
    #         forming a closed pentagon.
    # `(0, 255, 255)`: The color of the polygon's lines. In OpenCV's BGR format,
    #  this is yellow.
    # `5`: The thickness of the lines, set to 5 pixels wide here.
    # `cv.LINE_AA`: Use "anti-aliasing" mode to draw smoother, nicer-looking lines.
    cv.polylines(modified_image, [pts], True, (0, 255, 255), 5, cv.LINE_AA)
    # --- Image display loop ---
    # Enter an infinite loop to continuously display the image windows.
    while True:
        # Display the original image.
        cv.imshow("Original Picture", source_picture)
        # Display the image with the polygon drawn on it.
        cv.imshow("Picture with Polygon", modified_image) # Clearer window name!
        # The cv.waitKey(1) function pauses the program for
        # 1 millisecond to check for a key press.
        key = cv.waitKey(1)
        # If the ESC key (number 27) is pressed, exit the loop and end the display.
        if key & 0xFF == 27:
            break
    # --- Release resources ---
    # Finally, close all image windows created by OpenCV to free up computer resources.
    cv.destroyAllWindows()
Program Result:
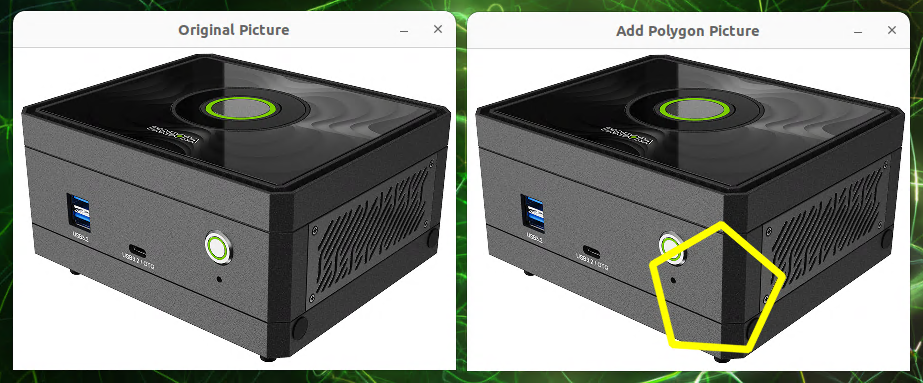
The example opens the original image beside a copy containing the yellow pentagon.
Common uses include:
- Outlining irregular regions or segmentation boundaries.
- Drawing custom geometric overlays.
- Visualizing paths, zones, and map boundaries.
Change the coordinates in pts, add or remove vertices, or toggle isClosed to compare open and closed paths.
Add Text to an Image
Use cv.putText to add labels, measurements, status messages, or recognition results directly to an image.
Signature
The Python binding uses this signature:
cv.putText(img, text, org, fontFace, fontScale, color[, thickness[, lineType[, bottomLeftOrigin]]]) -> img
org is the bottom-left corner of the text baseline. fontFace selects an OpenCV Hershey font, fontScale controls size, and bottomLeftOrigin changes the image-origin convention. The function modifies and returns img.
Example: write “Pandora”
The following code will write the text "Pandora" on an image and make it red.
import cv2 as cv
# Set the path to the original image file.
file_path = "Pandora.png"
# Read the image using OpenCV's imread function.
source_picture = cv.imread(file_path)
# Check if the image was loaded successfully.
if source_picture is None:
    print("Warning: Could not load the image.")
    print(f"Please check if the path is correct: {file_path}")
else:
    # --- Create a "canvas copy" of the image ---
    # We create a "copy" of the original image called `modified_image`.
    # This way, when we write on `modified_image`,
    # we don't affect the original `source_picture`.
    # You'll be able to see a side-by-side comparison of the original and
    # the modified image!
    modified_image = source_picture.copy()
    # --- Write text on the image! ---
    # The cv.putText function will write text on `modified_image`.
    # 'Pandora': The text content we want to write.
    # (270, 125): The starting coordinate (x=270, y=125) of the text's
    # bottom-left corner.
    # cv.FONT_HERSHEY_SIMPLEX: We've chosen to use this common and simple font.
    # 1.0: The font scaling factor, set to 1.0x size here.
    # (0, 0, 255): The color of the text. In OpenCV's BGR format, this is pure red.
    # 3: The thickness of the text strokes, set to 3 pixels wide here.
    cv.putText(modified_image, 'Pandora', (270, 125), cv.FONT_HERSHEY_SIMPLEX,
               1.0, (0, 0, 255), 3)
    # --- Image display loop ---
    # Enter an infinite loop to continuously display the image windows.
    while True:
        # Display the original image.
        cv.imshow("Original Picture", source_picture)
        # Display the image with the text written on it.
        cv.imshow("Picture with Text", modified_image) # Clearer window name!
        # The cv.waitKey(1) function pauses the program for
        # 1 millisecond to check for a key press.
        key = cv.waitKey(1)
        # If the ESC key (number 27) is pressed, exit the loop and end the display.
        if key & 0xFF == 27:
            break
    # --- Release resources ---
    # Finally, close all image windows created by OpenCV to free up computer resources.
    cv.destroyAllWindows()
Program Result:
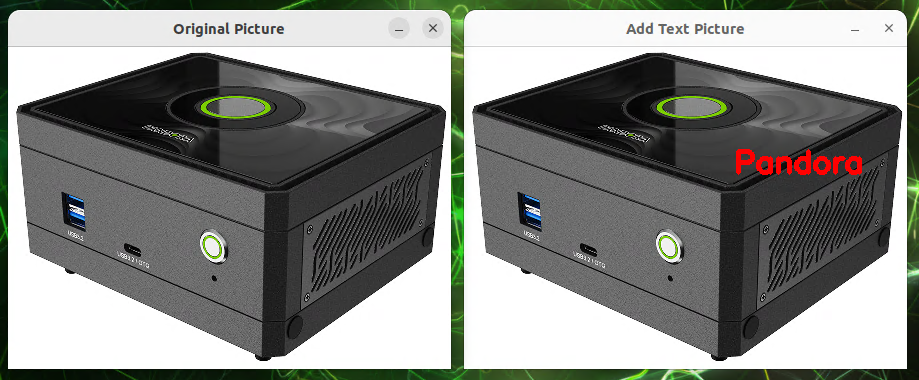
The example opens the original image beside a copy labeled “Pandora.”
Common uses include:
- Adding watermarks or source identifiers.
- Labeling detected objects and regions.
- Displaying confidence scores, measurements, or status information.
- Writing titles and explanatory overlays.
Change text, org, fontFace, fontScale, color, or thickness to adjust the label.
Adapted from the original YUAN Developer Hub article. Source ID: 248.